DIY Friday – spray paint basics

Every time I start a spray paint project, I make a mental note to share some of my painting tips because even though I’m well used to spray painting, there was a time when I wasn’t. And I know there are others out there who are equally as intimidated as I was. And like I’ve said before, if I can do it, anyone can. So here are my spray painting tips and tricks …  

Before I begin with my tips and tricks, I’m going to be Captain Obvious and say you should always paint in a well ventilated area. This doesn’t necessarily mean outside, just somewhere that gets a good supply of air and isn’t windy. Wind + spray painting = sworn enemies.  

1. SPRAY TECHNIQUES / TIPS – First up, make sure the object you’re spray painting is clean and sanded {if needed}. Shake your spray paint can vigorously. For like, 2 minutes. Shake it so hard your neighbours hate you. Then do a little test spray on a piece of paper as the first spray is usually clear liquid. Hold the can about 2 feet away from your piece. If you hold your can too close, little ‘waves’ of paint will appear and we don’t want that. Start painting your piece from the bottom upwards – like you’re writing a letter from the bottom up. Sweep across and paint one line. Stop. Then sweep across a little higher and do another line. Stop. Continue this until you reach the top of your piece. Should you need to apply a second coat, let the first coat completely dry first. 

2. AREA COVER – Unless you’d like a permanent reminder of your project, you’re going to need something to cover the ground underneath whatever you’re painting. The easiest thing I’ve found is to use old bed sheets. Don’t have any? Then help out your local charity shop and pick out a couple of sheets there. I also use old pillow cases for smaller projects such as spray painting picture frames. Simply lay them under your project, and when you’re finished, fold them back up for next time. 

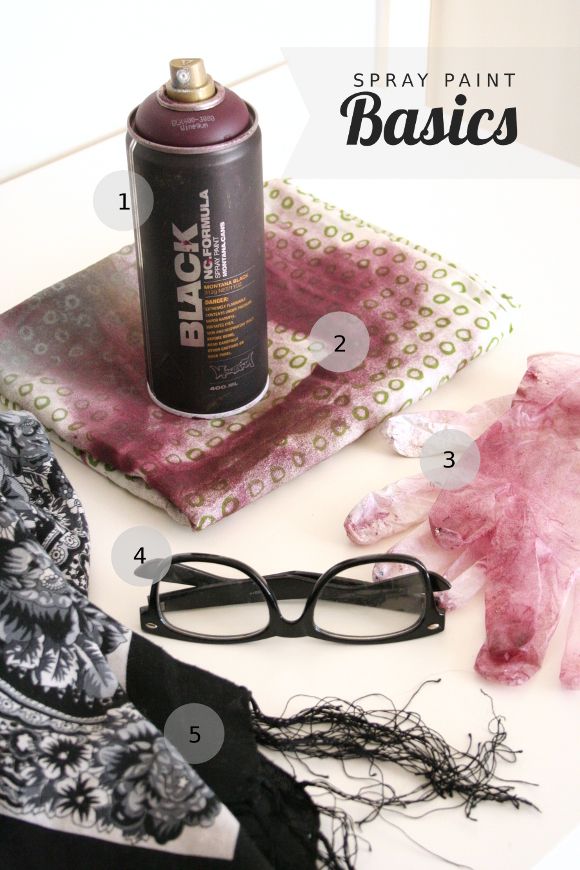
3. GLOVES – This isn’t mandatory, but I always make sure to wear gloves while spray painting, and on both hands. Sometimes the cap can be unruly and my spraying hand can get a bit of spray back / drippage {this all sounds like I’m using a urinal}, so it’s best to wear a pair of gloves. Where do I get mine? I save my disposable gloves after I dye my hair and reuse them for spray painting. I should really be on that Superscrimpers show. 

4. EYE PROTECTION – There isn’t really a risk of things hitting you in the face while spray painting, but I always wear my sunglasses or oh so trendy hipster glasses whenever I’m painting for some reason. I think it has something to do with my next point … 

5. MASK – In the beginning when I first started spray painting, I made the rookie mistake of not covering my face. Doesn’t sound like much of a deal, right? Wrong. For 2 days after spray painting without proper face cover {and without proper ventilation as it turns out}, every time I blew my nose, it was a rainbow of the colours I had been spray painting with. Yeah, not so good. You don’t realize it, but you can inhale a lot of speckles / fumes. If you don’t have proper gear {I’m hoping to get a proper mask that looks like a gas mask ’cause that would be cool}, your second best option is to grab a scarf and tie it around your face like so – 

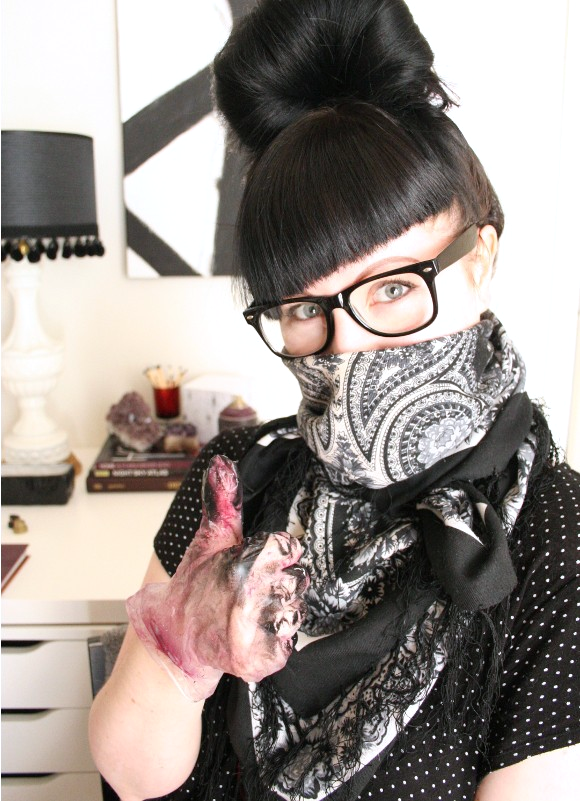
… so you too can rock the hipster graffiti cowboy bandit look {and in pajamas; while we’re on the topic of my outfit}. Isn’t safety sexy? I think the answer you’re looking for is no. Yes, your face will get a bit sweaty but it’s better than inhaling fumes. 
So friends I hope this was a little bit of help to any of you who may be hesitant to pick up a can of spray paint. It’s very rewarding and if you’re nervous at first, practice on an object you don’t mind ruining.

Happy Friday, homies! xx A

DIY Friday – chalkboard clipboard

Before I dive into today’s DIY, I want to thank you guys for your words and support regarding Wednesday’s post. I stare at my blog every day, so sometimes I need a kick in the hole to remember how much I have managed to achieve here. At the same time, I’m attempting to step out of my comfort zone and start contacting people about projects. I’m happy at the rate I’m going, but I want to kick it all up a notch. I’d love to get into doing upcycling for reals, one piece at a time. And now I’m rambling. Onto the DIY! 


In June of last year I painted a blackboard shopping list in our kitchen. It was great, served its purpose well, and we get tons of use out of it but I always looked at it and thought it could do with being pimped out just a bit. I had a light bulb moment when I happened to bring my clipboard into the kitchen one day, and thought the marriage of the two would be a perfect focal point in our kitchen. And I will say, a painfully simple DIY … 

I took the above ‘before’ picture yesterday morning before work. It was only when I began editing the photos I realized I hadn’t erased what was on the chalkboard. Great. Toilet cleaner. Don’t panic, you can edit that out on Photoshop. But then I thought no, keep it real. Yes, we need toilet cleaner. If I edit it out, I might forget to get it when we go shopping. Maybe you need to get toilet cleaner this week too? Okay, enough about toilets. Onto the DIY.

What you’ll need – a clipboard, some masking tape, a paint brush, some blackboard paint, a hammer and a nail.

Step 1 – using some masking tape, mark the border for the area you’d like to paint on your clipboard. You can of course throw caution to the wind and paint the whole thing if you’d like. Step 2 – paint that baby good. I applied two light coats of chalkboard paint. Step 3 – before the paint dries, peel off the masking tape. Step 4 – set it aside and allow it to dry, then hang that baby up wherever you like.

Voila, c’est fini! And that is my super simple DIY this week. For the week that it is, I hope you have a safe and eventful St. Patrick’s Day weekend! Monday is a national holiday here in Ireland, and I tell you, I cannot wait to sleep in 3 days in a row. xx A

Upcycle for Oxfam

I’m tore-up-from-the-floor up excited to finally share my Upcycle for Oxfam project with you guys! Yes, it’s not technically upcycling, but ‘upcycling’ along side ‘Oxfam’ had such a nice ring to it.

As I hinted at the end of January, I was asked by Oxfam Ireland to partake in their Heroes campaign; to celebrate the women in our lives through various mediums, and help raise funds for heroic women around the world living in poverty. 

Oxfam approached me to revamp a piece of second-hand furniture for their Heroes campaign and at the end of March, the revamped piece would go for auction. Um, WOAH. I of course said yes and I couldn’t wait to get on board. Soon I was in my element in second-hand heaven at Oxfam Home, where I came across these lonely bedside tables and I immediately knew I could give them a new lease of life. So much potential, and I loved their shape. 

Right, so what am I going to do with them? Good question. Well they should be feminine since they’re for the Heroes campaign. Unfortunately, my first thought was “they would look absolute perfection in high gloss black with modern hardware” I had to quickly remind myself this is a project for Oxfam, not for me. It has to be something that would appeal to other people, not just me. It took me about a week, but I came up with a light, modern and chic {at least I hope so} design proposal and sent it Oxfam’s way …

And luckily, they loved it! I didn’t waste any time and dove straight in that evening after work. Here are the steps I took to redecorate them …

Step 1 – I first removed the doors and hardware from both bedside tables, sanded them thoroughly, and cleaned them of all remaining dust and debris with a damp rag. Step 2 – I primed both bedside tables. After the primer dried overnight, I applied my first coat of Dulux Easycare Satinwood paint, followed by a second coat the following day. 

Step 3 – I painted the interior and back panel of the bedside tables in Ashbury Easycare pink from Dulux. I used 2 sample pots which cost about €3 altogether, in stead of buying a tin. I should say the pink paint is a lot pinker in real life. You can thank the overcast Irish weather for my muddled photos, but you get the basic idea. Step 4 – after two layers of pink paint, I started working on the decoupage. I bought some Annie Sloan decoupage glue / varnish from Rua, who were immensely helpful and suggested I check out The Graphics Fairy for pretty vintage images. I chose my favourite floral images and printed them out {in work – shhhh}. I cut out each flower and using the decoupage glue, I added each flower to the base of the bedside tables and added a thin layer of decoupage glue to seal them. In total I added 5 coats of the decoupage glue – this sounds excessive, but it really blended the edge of the paper into the base. It doesn’t take long for each coat to dry so it was done in no time. 

Step 5 – last but not least, I added new hardware onto the bedside tables. The previous hardware was incredibly rusted. It was tough to open the doors, and once they were open, it was near impossible to close them again, so I replaced everything. Since both of the doors opened in the same direction {see ‘before’ picture above}, I added one of the doors to open in the opposite direction to suit the left side of the bed, to make them a perfect pair. 

And there you have it! I’m quite sad to see these bedside tables go as I gave them my all, but at the same time I’m so very chuffed I could contribute some of my DIY and redecorating skillz to such a worthy cause. This project really made me aware of how much I adore transforming stuff, and it’s something I’d really like to get into. The cogs are turning.

To find out more details and ways to celebrate the heroic women in your life, check out the Oxfam website. What lady in your life is your hero? Your sister, mom, aunt or daughter? My hero is my mom. You name it, we’ve been through it over the years, and my mom has always put everyone else’s needs before hers. She’s so incredibly selfless and doesn’t have a bad bone in her body. Mom, you really are my hero. Oh god – who’s chopping onions at my desk?!

xx A