Before I share the exciting side of my design ideas for the nursery, I first have to tackle the far less exciting side that is the spare bedroom as it is now and getting it from this point to an empty room. Sounds easy? It’s not as straight forward as I’d like it to be thanks to us being renters living with our landlords furniture and not having as much freedom as a homeowner would have. But I’ve successfully managed to come up with a solution to almost every problem.
Feel free to allow your eyes to glaze over while you scroll as chances are you won’t find the below particularly interesting. It’s a solution I’ve come up with as a renter so I figured maybe one other person out there might find it interesting, so here it is …
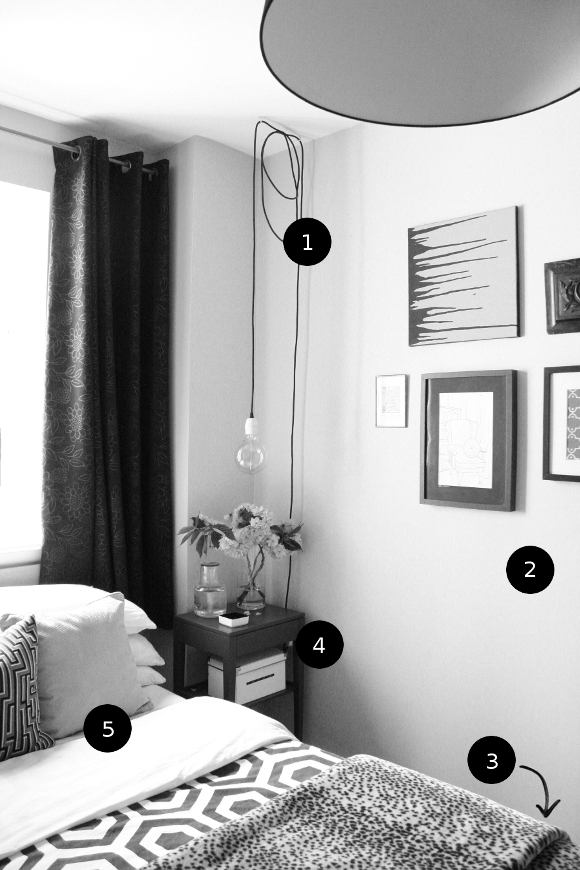
1. DOWN WITH THIS SORT OF THING – and everything else on the walls. I’ve found so many cute things to hang up and have some fun ideas, but that can’t start until I repaint.
2. REPAINT – this is an obvious step but it’s something that needs to be done before I start working on the nursery. I just need to decide on a colour.
3. UNDER THE BED –
four years’ worth of college work and the dismantled shelves from our living room [as in the ‘before’ photo here] have been expertly rammed stored under our spare bed. Out of sight, out of mind! That is, until we get to number 5 below …
4. DECLUTTER – I’ll be doing another sweep of what we have at the moment and either selling or donating as much as I can. I’ve gotten rid of a lot over the past two years but thanks to nesting hormones, I want to get rid of everything unnecessary.
5. DISASSEMBLE THE SPARE BED – since we’re renters and the bed in the spare bedroom is our landlord’s, we can’t get rid of it. My plan is to stack the spare mattress on top of the mattress in our bedroom, disassemble the spare bed and store it under our bed. I also have to relocate the college work and shelves that are currently under the spare bed to under our bed and hope it all fits.
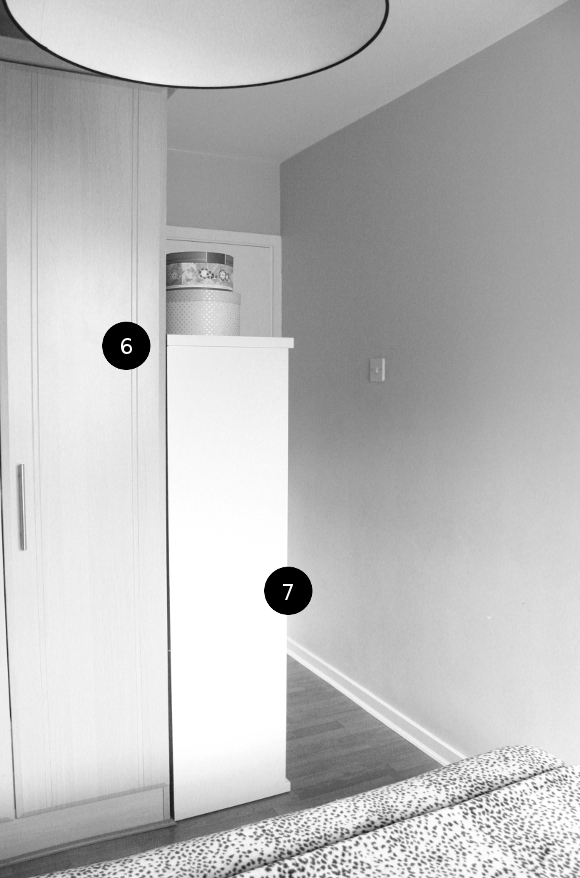
6. CHAOTIC CUPBOARDS – possibly scarier than under the bed; the cupboards in our spare bedroom. They hold about half of everything we own. Our Christmas decorations, more college work, my wedding dress, a printer, our landlords artwork, old Playstations, summer / winter clothes, one hundred years of wrapping paper that’s too pretty to use and mementos to name a few. All have to be ruthlessly culled.
7. MOAR SHELVES – this random set of shelves belongs to our landlord and sit awkwardly at the entrance to our spare bedroom creating a bottle-neck to the room [which will be v. awkward when bebe comes]. We keep our DVD collection on them at the moment, but I’m hoping to move the DVDs elsewhere and put these shelves within the cupboard [no. 6 above] so the shelves can house overflow bebe stuff that we won’t have room for in the room itself.
If you’ve read this far, I commend you! If you haven’t, I don’t blame you. That’s the plan I have so far to get the spare bedroom ready for its new design and subsequently, new occupant. I cannot wait to share the plans I have for the nursery! Not to mention get started on decluttering and organising and assembling tiny bebe things.
And for good measure, I’ll end on an awkward selfie …
A photo posted by Alex C – The Interior DIYer (@interiordiyer) on Jun 4, 2016 at 7:43am PDT