Colour correcting a Christmas tree

Last Christmas we got a new Christmas tree. We had our previous skinny tree [as seen in this post] for 6 years, which we bought especially for our first apartment which was the size of a matchbox. Such a skinny tree always looked odd in our current living room, so last year I thought it was time to treat ourselves to a full sized tree.
I looked for a couple of weeks but couldn’t find a decent secondhand faux tree online, so we went for a new tree. I picked one out, we brought it home, I opened the box and immediately had an awful feeling. The colour was very wrong. It was way more yellow than a normal tree which made it look dead. A dead looking fake tree.

You can’t tell the true awfullness of the colour of our tree in last year’s pictures because I actually edited the colour on my computer before sharing the pictures. That’s how horrified I was with the colour. The feeling of dread crept up when I soon realised I’d be unboxing our vom-coloured tree again this year, but then I had a very simple idea – just paint it.

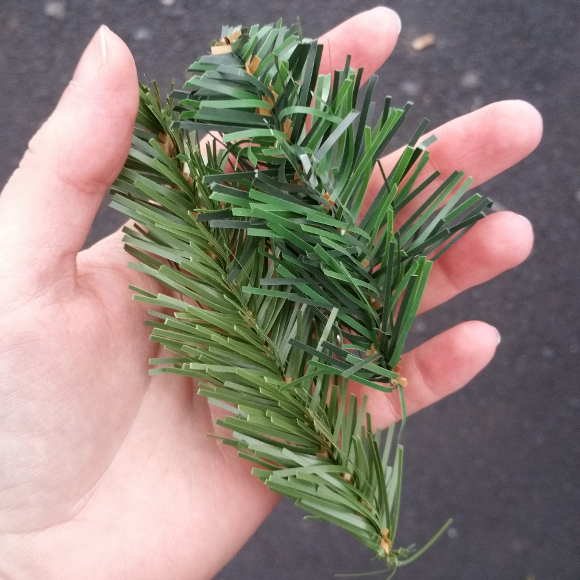
The above will give you a better idea of the colour difference – on the left is our previously Exorcist-Green Christmas tree compared to a piece of proper green garland. It may not look too bad here, but when you’re looking at an entire tree that colour, it was very obviously wrong. 
I headed to All City Graffiti on Crow Street last week on the hunt for a merrier green to spray paint our tree and found the perfect shade of ‘Amazonas Green’ …

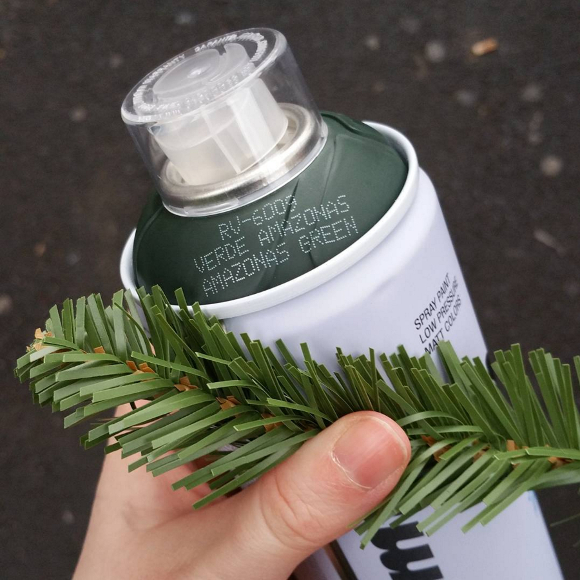
That afternoon I took our entire Christmas tree outside and set it up / opened up all the branches. There was a light breeze, which I used to my advantage, and I used it to lightly mist the whole tree vs. spraying it with an intense stream of paint. Holding the can about 1 foot away from the tree I sprayed one section at a time, turned it, sprayed another section, turned again, and repeated until I was happy with the coverage. It was incredibly easy to paint in this way and I was finished in about 20 minutes [including drying time as the light breeze was again very helpful].

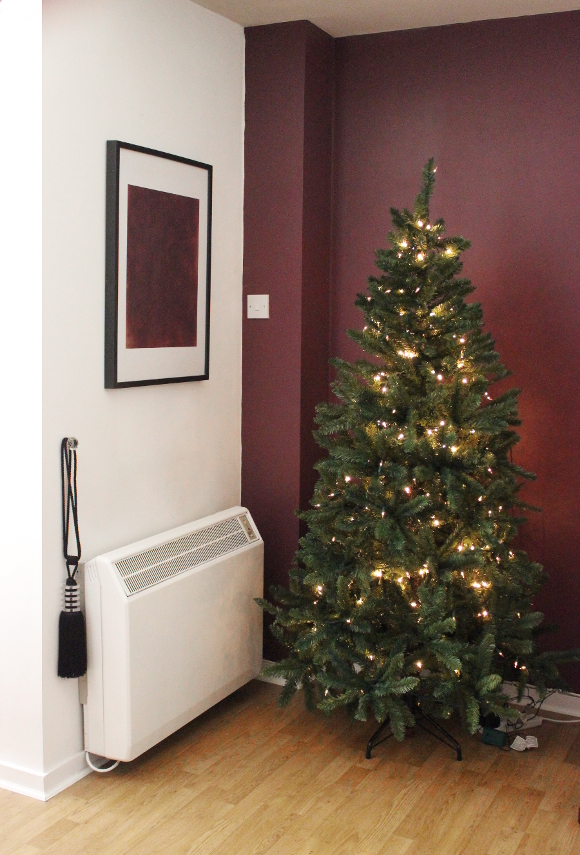
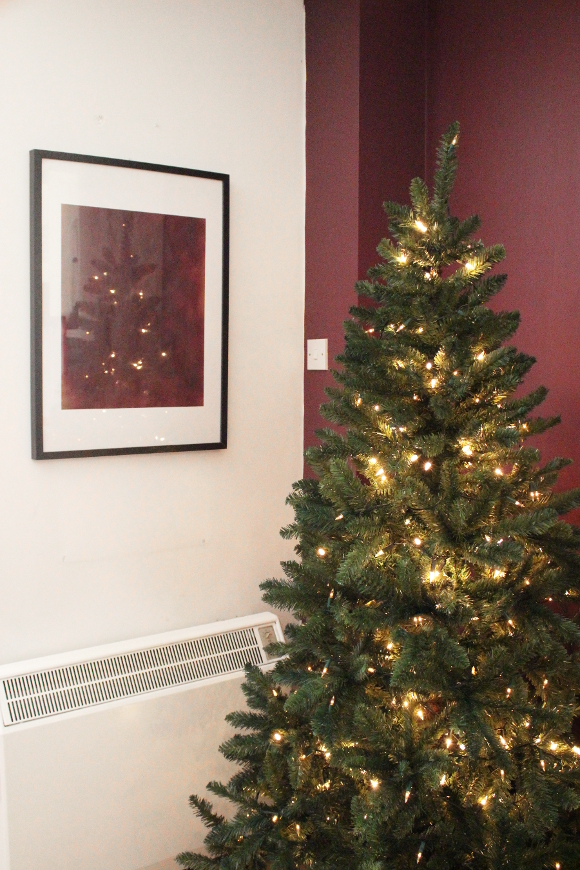
I’m really so much happier with the colour of our tree. The last thing I wanted to do was have to buy another Christmas tree as that would have been a complete waste and I’m very conscious of buying things unnecessarily, so I’m so glad it turned out looking as good as it does. It’s a proper Christmassy green now and it no longer makes me cringe when I look at it. Yay! o/

I put 2 sets of lights onto it this year [one plain, the other chasing lights] and I’m quite happy with just leaving it like that. I like the idea of just lights this year. Leaving it as a naked tree. What do you think? I’m going to add some sort of makeshift tree skirt and maybe some ribbon to the very top, but overall, no decorations. I just really like the idea of keeping things a bit simpler this year. 

Nursery dresser makeover!

It  really feels like things are moving at a snails pace these days [myself included], but things are finally getting ticked off my to-do list. One of them being the nursery. Between appointments and classes and endless lists of what to do and get, there’s so much involved in getting ready for a baby. And once you get everything struck off your list, you start thinking of more things you should do. My lists are reproducing. Or sometimes you just want to lay the hell down and nothing gets done for a day or two. Do I sound complainy? I really don’t mean to, I’m just glad things are finally starting to fall in place!

Back when I first put some ideas together for transforming our spare bedroom into a nursery, I wanted to source as many secondhand items as possible. So when we were looking for a dresser / changing table, I took to Adverts.ie and found a perfect sized one for €45 …

It  was a standard dresser in relatively okay condition. I knew I’d be painting it as there were already a lot of different wood finishes in the room – walnut crib, faux pine floor, some other faux wood on the built-in wardrobes and then the chicken-fat orange wood around the windows, the combination of them all together just wasn’t working.  

Since our spare bedroom / nursery is a fairly dark room and the dresser would be going under the window [potentially blocking more light from the room], I didn’t want to go with anything too wild or dark on the dresser. When it came down to it, I wanted to keep it light and bright. I still had some leftover white Rustoleum paint from updating our bedside tables this time last year, so on went 5 even coats of plain white paint all over. I thought of doing a faux marble effect again, but quickly changed my mind as I didn’t want to overdo it.

As for the details on the dresser, I kept it relatively simple. I spent about 2 weeks looking for the perfect hardware for the drawers. I found these black rose knobs and backplates on Etsy [which I don’t think is a genuine Etsy seller and is probably a warehouse of sorts, but welp. I couldn’t find them elsewhere and I really wanted them so I got them]. I thought they were a perfect mix of whimsical, dainty and a little bit gothic. I decided to order just two knobs for the top drawers and went with very simple knobs for the rest of the dresser  as I didn’t want to overkill it [I found perfect budget-friendly untreated pine knobs in Woodie’s that I painted matt black]. 

Since getting my hands on Emma’s Tangled Hawkmoth wallpaper, I immediately knew I’d be lining the drawers of any future nursery dresser with it. Unfortunately we can’t hang wallpaper in our apartment [boo, renting], so into the drawers it went. It works so perfectly and I love seeing peeks of it underneath all the tiny baby clothes. I want to line ALL OF THE THINGS WITH IT NOW.

As for the feet of the dresser, I’ve not done anything just yet with them. I’ve left them unpainted as they were, which in a way kind of makes it look like the dresser is floating [I know, a stretch] but I’m hoping to either swap them for different feet or just take them off entirely. 

I should also say sorry for all the tightly cropped nursery pictures – it’s really to spare your eyeballs from seeing the madness that lurks to either side of the nursery. Soon, though. Soon it should be finished! Considering baby is now finished cooking and I’m 40 weeks [and 4 days], but I think [see: hope] later this week baby will make her debut. Fingers crossed – but not legs. Legs are anything but crossed 😉

Nursery plans – part 2

I’ve managed to somehow not accidentally spill the beans on the gender of little bebe-to-be. Yet! Seeing as I’m sharing some design ideas today, spoiler alert: we’re expecting a little girl! We were completely surprised when we found out as I was utterly convinced it was a boy [shoddy early mother instinct]. I wanted to avoid obvious choices for the nursery like pink and flowers etc. Maybe because I was convinced for so long it was a boy? This was one of the reasons I fell into a bit of a rutt … 

There are two reasons we hadn’t started the nursery until this week. For some reason [hormones], I had it in my mind that all the unfinished projects in our apartment had to be resolved before I could start the nursery. I made an 8-page list of things I had to do before we could begin. This ranged from cleaning the oven, painting the immersion, recaulking the bathroom, painting the ceilings and everything in between.

The second thing stopping me was the design of the nursery itself. I don’t know how or why [hormones], but I was under the impression [again, hormones] that the nursery had to be wildly different from the rest of our home; a different colour scheme, style and be gender neutral. I don’t know why. Did I mentioned hormones?

Luckily, over the past week I shook myself out of both mindsets. I realised I just want a cute and fun nursery [groundbreaking, I know]. We’re having a girl. Yes, I like burgundy. And pink. This isn’t new. I also like green but I’m not going to reinvent the wheel with our nursery by trying to make it something wildly different to what we already like. I’m hoping to make it fun and cute without it screaming ‘A LITTLE GIRL LIVES HERE ZOMG CAN YOU TELL THROUGH ALL THE HOT NEON PINK?‘. A little bit fun and a little bit Grand Budapest Hotel with gothic accents.

Less typing, more visualising! Onto the design we’re hoping for …

– A lot of the artwork for the nursery will be from what we already have [Bill Murray print, cardboard monogram etc.], will be second hand or from independent artists as much as possible.
– As for wall colour, I’m aiming for a subtle and cheery light grey paint. Fleetwood Paint sent me a gift voucher a few months ago and I’ll be excitedly picking up some tester paints this week. Yeah, grey is a safe shade. I decided on it because it goes with every colour [and I’m hoping to have a bit more colour in the nursery than the rest of our apartment], but also when we eventually move out, a subtle grey paint won’t need to be painted over compared to the living room and our bedroom. Forward thinking.
– Going with my mostly second hand theme, we picked up a standard pine dresser a few months ago for next to nothing on Adverts. I’m hoping to repaint it white at the very least; maybe something a bit more fun. We have yet to find an armchair to re-cover, but im hoping to find one soon. SOON.
– I’m also just hoping to put a lot of fun and cute things in here; hopefully appealing to both babies and adults alike. Some amigurumi creatures, alternative pieces and a handfull of cheeky things that’ll surely make our nursery a lot less worthy of appearing in a magazine [ahem, poo pillow and my ‘Even Katy Perry Poops‘ cross stitch #KeepingItReal].

I don’t have an entirely set design in mind so we’re mostly going to see what we find and do a bit of winging it. But the above are the basics and I’m hoping to build on it as we go. It’s exciting now that we’re about to start, but we better hurry up as we have T minus 9 weeks … ZOMG 🙂