I’m tore-up-from-the-floor up excited to finally share my Upcycle for Oxfam project with you guys! Yes, it’s not
technically upcycling, but ‘upcycling’ along side ‘Oxfam’ had such a nice ring to it.
As I hinted at the end of January, I was asked by Oxfam Ireland to partake in their Heroes campaign; to celebrate the women in our lives through various mediums, and help raise funds for heroic women around the world living in poverty.
Oxfam approached me to revamp a piece of second-hand furniture for their Heroes campaign and at the end of March, the revamped piece would go for auction. Um, WOAH. I of course said yes and I couldn’t wait to get on board. Soon I was in my element in second-hand heaven at
Oxfam Home, where I came across these lonely bedside tables and I immediately knew I could give them a new lease of life. So much potential, and I loved their shape.

Right, so what am I going to do with them? Good question. Well they should be feminine since they’re for the Heroes campaign. Unfortunately, my first thought was “they would look absolute perfection in high gloss black with modern hardware” I had to quickly remind myself this is a project for Oxfam, not for me. It has to be something that would appeal to other people, not just me. It took me about a week, but I came up with a light, modern and chic {at least I hope so} design proposal and sent it Oxfam’s way …

And luckily, they loved it! I didn’t waste any time and dove straight in that evening after work. Here are the steps I took to redecorate them …
Step 1 – I first removed the doors and hardware from both bedside tables, sanded them thoroughly, and cleaned them of all remaining dust and debris with a damp rag.
Step 2 – I primed both bedside tables. After the primer dried overnight, I applied my first coat of
Dulux Easycare Satinwood paint, followed by a second coat the following day.

Step 3 – I painted the interior and back panel of the bedside tables in
Ashbury Easycare pink from Dulux. I used 2 sample pots which cost about €3 altogether, in stead of buying a tin. I should say the pink paint is a lot
pinker in real life. You can thank the overcast Irish weather for my muddled photos, but you get the basic idea.
Step 4 – after two layers of pink paint, I started working on the decoupage. I bought some
Annie Sloan decoupage glue / varnish from
Rua, who were immensely helpful and suggested I check out
The Graphics Fairy for pretty vintage images. I chose my favourite floral images and printed them out {in work –
shhhh}. I cut out each flower and using the decoupage glue, I added each flower to the base of the bedside tables and added a thin layer of decoupage glue to seal them. In total I added 5 coats of the decoupage glue – this sounds excessive, but it really blended the edge of the paper into the base. It doesn’t take long for each coat to dry so it was done in no time.

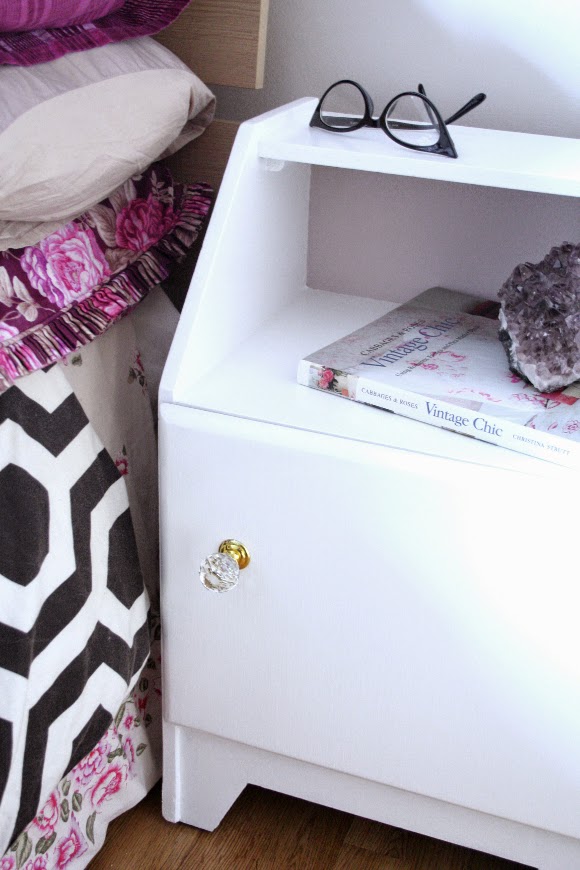
Step 5 – last but not least, I added new hardware onto the bedside tables. The previous hardware was incredibly rusted. It was tough to open the doors, and once they were open, it was near impossible to close them again, so I replaced everything. Since both of the doors opened in the same direction {see ‘before’ picture above}, I added one of the doors to open in the opposite direction to suit the left side of the bed, to make them a perfect pair.

And there you have it! I’m quite sad to see these bedside tables go as I gave them my all, but at the same time I’m so very chuffed I could contribute some of my DIY and redecorating skillz to such a worthy cause. This project really made me aware of how much I adore transforming stuff, and it’s something I’d really like to get into. The cogs are turning.
To find out more details and ways to celebrate the heroic women in your life, check out the
Oxfam website. What lady in your life is your hero? Your sister, mom, aunt or daughter? My hero is my mom. You name it, we’ve been through it over the years, and my mom has always put everyone else’s needs before hers. She’s so incredibly selfless and doesn’t have a bad bone in her body. Mom, you really are my hero. Oh god – who’s chopping onions at my desk?!
xx A