Got ‘nog?

This recipe brings me some serious redolent memories – pyjamas, decorating the Christmas tree with my family, and opening the fridge and helping myself to full-to-the-brim glasses of eggnog from the carton.
Eggnog is a North American phenomenon, and hasn’t reached our shores in Europe – that I know of. Not here in Ireland at least. Three years ago I gave this eggnog recipe a spin with my family, and it went down a treat. I made it again this past weekend, and with the help of some old school Christmas music, fiance and I were well on our way to decorating our apartment. 

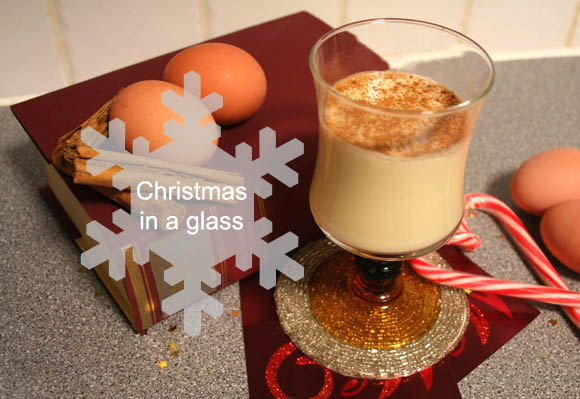
This recipe however, has a rather hearty kick of rum in the mix, but it can be made without rum in order to appeal to a wider audience. Full eggnog recipe is stored away neatly below. It seriously is Christmas in a glass. Srsly.

Note: I halved this recipe for fiance and I. Half the recipe still gave us 3+ glasses each. We were well on our merry way!

Ingredients
12 egg yolks*
5 cloves {I ground them up. You can leave them whole if you like}
4 cups of milk
3 1/2 cups of cream {substitute with soya cream for less inches on your waist}
3 cups of light rum
2 cups of sugar
2 teaspoons of vanilla essence
1 teaspoon cinnamon, ground
3/4 teaspoon of nutmeg, ground


Method


In a saucepan over low heat, blend the milk, cinnamon, cloves and half
a teaspoon of the vanilla essence. Keep stirring while mixture heats,
and remove from heat just before boiling point.

In a bowl, mix together the sugar with all those egg yolks. Whisk them well so that they’re light and fluffy. Gently and a little at a time, pour in the milk mixture while continuing to whisk.
Transfer mixture back into your saucepan over a medium heat while
continuing to stir. Keep stirring until your eggnog mixture gets closer to
resembling custard. Never let it reach boiling point!

Pour the mixture into a jug, making sure to remove the cloves. Stand
jug in the fridge or leave on the stove top for an hour or two to allow it to cool. Stir in the
cream, light rum, remaining vanilla and ground nutmeg. Serve in glasses all pretty with a little extra ground cinnamon sprinkled on top.


*I put the egg whites into a container and freeze them. Then there’s a
load of whites ready to be defrosted should you make meringue or
anything needing that much egg whites. Waste not, want not! 

Oh my, pecan pie

We celebrated Canadian Thanksgiving a week late this year, but it was still a gastronomic success. Turkey, stuffing, sprouts, and a good dose of wine, our Thanksgiving was complete. What I brought to the table was this little dish – one that we haven’t had in 7 years – pecan pie. And it was a delight, if I may say. I made a little maple leaf to match the season and occasion and placed it on top {I baked it separately on a baking tray, otherwise it would go soggy}. 

This is the most straight forward recipe – hand on heart. It takes about 4 minutes to make the filling. God bless simplyrecipes.com
If you’re feeling extra cheeky, serve with whipped cream with a splash of maple syrup. In case you didn’t ingest enough sugar. To die for. Recipe details after the jump. 

Ingredients
1 recipe for pie crust base – I found a really good one here
1 1/4 cups pecans, roughly chopped {save some whole pecans for decoration}
2 eggs, lightly beaten
1 cup light corn syrup (I used Lyle’s brand)
1/4 cup brown sugar
1 tbsp molasses {I couldn’t find any, so I just used a touch more corn syrup}
2 tbsp melted butter
2 tbsp flour
1/4 tsp salt
1 tsp vanilla

Method
Blind bake your pie base for 10 minutes. Spread the chopped pecans over the base. Mix the remaining ingredients, and pour over the pecans, which will rise to the surface. Place your decorative pecans on top. Don’t worry, they won’t sink. Cook for 45 minutes at 180C. Keep an eye on the pastry for the final 10 – 15 minutes. If it’s getting too overcooked, turn the temperature down.

Remove from the oven and allow to cool completely before serving with or without ‘sugar-induced-coma’ maple whipped cream. Mmm.
Click here for a handy cooking calculator, should you prefer to measure in cups, mls, oz, etc.

Happy Thanksgiving!

To all my fellow Canadians out there, I’m {jealously} wishing you all a Happy Thanksgiving! Our family celebrates it here in Ireland, but it’s just not the same. My mom is out of town at the moment, so we’ll be celebrating it next weekend. Please enjoy something dipped in maple syrup or wrapped in bacon for me.

My only other news worthy of blogging is this past Saturday morning I woke up early and painted one of our living room walls in blackboard paint, and I’ve turned into an 8 year old again. My mind is doing cartwheels just thinking of decorating it for Halloween. So far, this is all I’ve tackled – plus the necessary test drawings one can imagine. Just to make sure it’s working properly. 
TIPS should you use blackboard paint yourself – it’s like tar. Very thick paint, and it takes 24+ hours to dry. Try to keep your windows open as much as possible {it stinks}, wear clothes you don’t mind ruining, and don’t use your favorite paint brush or roller. Be prepared to throw them out if you don’t have any white spirits at hand.