Bedroom dresser update – the plans

Ever since I painted our bedroom black the night before Cora was born, there were a few things that needed to be updated. Our black curtains were one, and our dark grey dresser was another. Don’t get me wrong, I love black and wear nothing but black all the time, but there was too much of it in our room. Our dark dresser was now too close to the colour of our bedroom walls, and since we now had a baby, repainting a dresser was pretty low on my priority list.

At the beginning of December, Rust-Oleum got in contact about working on another project and asked if there was any furniture of ours that needed updating. I immediately thought of our bedroom dresser so took it as a perfect opportunity to update it in a completely new way.

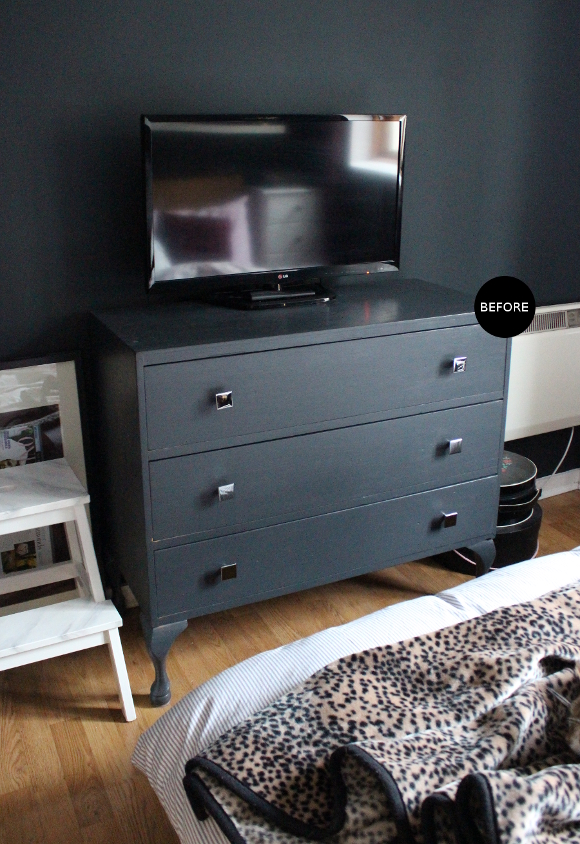
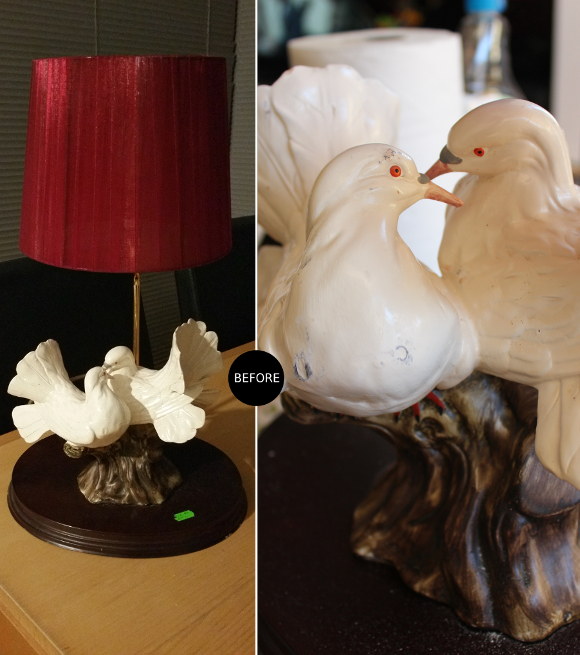
Here’s what our dresser looked like before [and even before that – yeesh]. I spent a few days on Pinterest and decided on the lightest of pink paint. Rust-Oleum’s Chalky Finish Furniture Paint in ‘Strawberry Vanilla’ was perfect, topped with Rust-Oleum’s Furniture Lacquer to give a protective finish to the chalk paint. At first I was thinking of making our dresser very ornate with gold handles and add wood appliques to the drawers [kind of like this], but the longer I thought about it the more I realised it would be bad-fake [I’m not too keen on fake antiquing, unless it’s done really well and I didn’t think I could]. Our dresser is old and very possibly mid-century-something, so I decided to stick to a design that suited it a bit better. And something a bit funner.

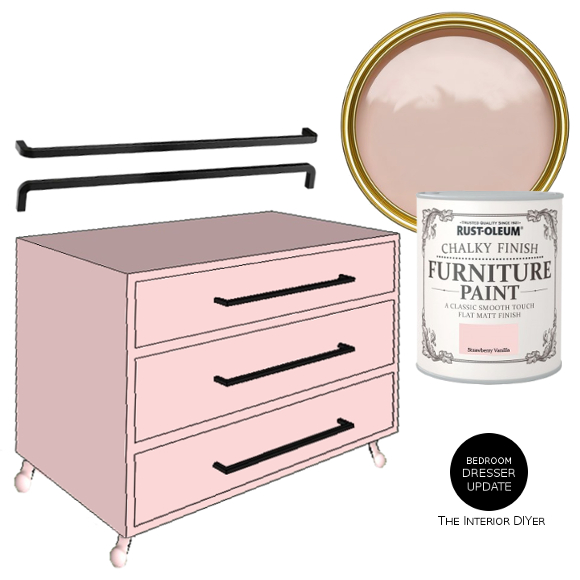
Because our apartment is so small, there’s not much space between the end of our bed and the dresser. Our knees / pockets / hips were forever getting caught on the current handles, so I was on the lookout for a long handle that wouldn’t catch on our knees / pockets / hips. To make things just a bit more awkward, I wanted a handle that would fit the existing holes which were placed 416mm apart. I found a beautiful pair of handles on Etsy, but the order became not only very delayed, but complicated so it was cancelled. Which is the main reason this update took so long.

I checked the IKEA website and not only did they have solid non-knee / pocket / hip-catching handles that were spaced 416mm apart, but they were beautiful handles. They were black borghamn handles and they were solid iron. I’m so close to finishing our dresser update and in fact I’ll be heading out today to pick up the sweet, sweet handles in what I’m hoping will be the fastest IKEA trip ever [I’m sure I’ll be over-sharing on my InstaStories if you’re curious]. Wish me luck. 
DISCLOSURE – while this blog post is not sponsored, I did receive this paint and lacquer free of charge from Rust-Oleum. As always, all words and opinions are my own. I only work with companies I like and of course, think that you will too. Thank you for supporting the companies that support The Interior DIYer. 
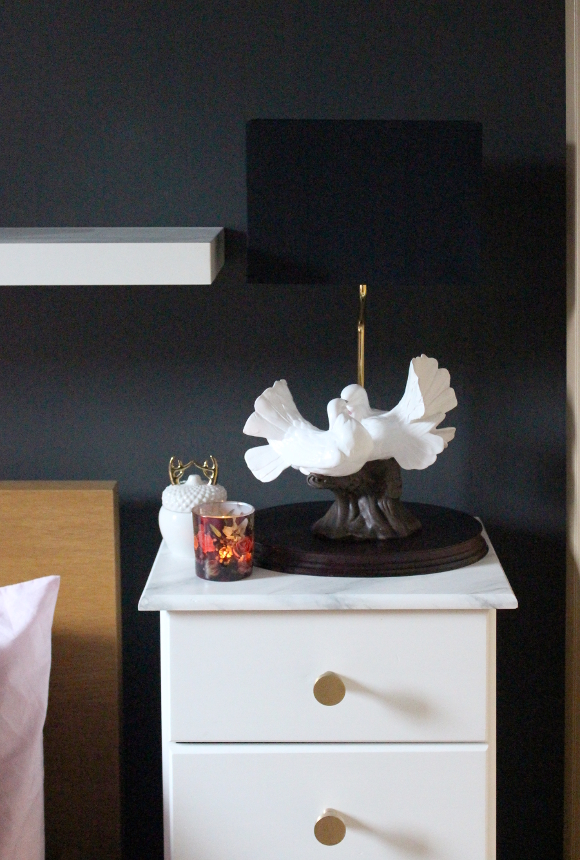
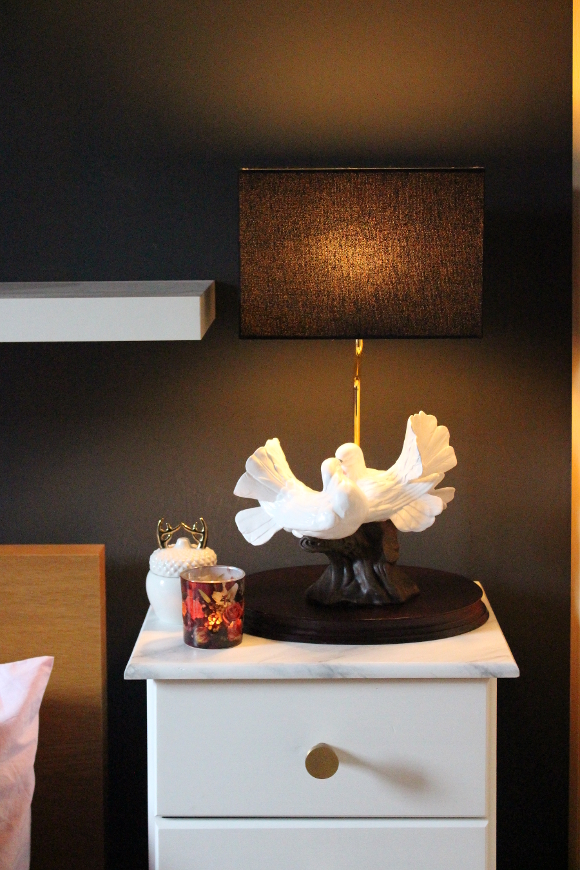
Previous projects with Rust-Oleum – faux marble bedside tables  

Our figgy wiggy turns one

For regular people, this is not a big deal. The fact that I’ve kept track of today’s date alone should prove how much of a deal this is for me. One year ago I bought and brought home our fiddle leaf fig and I’ve KEPT IT ALIVE FOR THAT ENTIRE TIME
Wow. That is in no way exciting. Thanks for wasting my time, Alex“, I hear you say. But for me, I’ve never been able to keep a plant alive for more than 6 weeks, maximum. In my entire 31 years. I stopped buying plants years ago for the plant’s sake as bringing one home was basically death row for them. Except I changed my mind when I saw a this fiddle leaf fig in B&Q Liffey Valley and I took a chance and brought it home. 
As I said in my original blog post, fiddle leaf fig plants are very trendy these days. I’ve always just liked the look of them so that’s why I bought one vs. their trendiness. Did I mention that fiddle leaf figs are some of the pickiest and most difficult plants to look after? Really great choice for old black thumbs here. But that’s why I’m so proud. I kept the pickiest damn plant alive for a year. And it grew! By 7 leaves! [but lost a few lower leaves when they got old and crusty and I ruthlessly clipped them off]. Dad DIYer re-potted our figgy wiggy yesterday [that’s how terrified I am of killing it – I didn’t even want to re-pot it myself] and it fit perfectly into our Uashmama gold paper bag [from Dust!]. 
My ‘secret’ to keeping ours alive? I water it every 1-2 weeks, more in the summer when it’s warmer, rub coconut oil on the leaves every 6 months, no direct sunlight and if the soil gets really dry, I submerge it in water then let it drain for a good hour afterwards. That’s it. There’s nothing more to this post other than the fact that I’m amazing and I kept a thing alive for a year. I’ve managed to keep Robert and Cora alive too, but they’re less picky. 

Second hand love dove lamp

I’ve been dying to share my latest second hand find. This morning Cora was compliant enough to let me take some pictures [while she kicked around on our bed], and I was even able to get a bit of a blog post together too. I am feeling very together and boss-mom. For now. I suspect this is a fleeting feeling.

A week or so before Christmas I stopped into Second Abbey to see if the gloriously kitsch dove lamp I spotted months before was still there, and luckily, it was [I’ve had terrible luck lately with things I’ve not bought being long gone the next time I go back to buy them]. The lamp was in good condition [meaning, it wasn’t broken], but it was in need of new paint as it was yellowed and scratched, and a new shade was desperately needed [the current shade was transparent red ribbon wrapped around the wire and looked terrible when the light was on].

First I cleaned and repainted the doves with white furniture paint. Robert wasn’t too keen on the dove’s anatomically correct beady red eyes that looked directly into his soul, so I painted them white along with the rest of their bodies. Don’t worry, they’re just sleeping! Very in keeping with their new bedroom environment.

I next focused on updating the lamp shade. The shape of the original shade really didn’t suit the lamp. It was far too narrow and made the lamp look very bottom heavy, so on Monday evening I headed to B&Q with crazy lamp in hand and tried a bunch of shades for size. It came down to either a gold glitter lamp shade [which I was very in love with but it unfortunately gave off a very strange glow when the light was on], or a rectangular black shade. As you can guess, the black shade won. The shape is so perfect for the lamp – it’s hard to tell but the size of the shade perfectly balances the oblong lamp base and anchors all the crazy going on below. But the lamp’s update is not completely finished yet. Because our bedroom is painted nearly black, the black shade disappears into the background. I’m thinking of maybe re-covering the shade in a different fabric and adding sassy tassels, but I’m going to take my time and think about what colours and textures might suit it before rushing into anything.

Yeah, it takes up nearly my entire bedside table, but I give zero cares. I just look at how amazing it is and then I get over it.