Getting nesty

It took me quite unexpectedly, but in the beginning stages of my pregnancy my design taste took a u-turn. It changed completely and I was very close to tearing everything out of our apartment, buying really colourful accessories and painting all the walls blue. I’m glad for my crippling morning sickness though as it stopped me from doing anything and luckily as the weeks passed I grew out of my temporary fad and started to love our apartment again [no offence to anyone who has a colourful home – I love colourful homes and applaud people who embrace colour! I just know after years of trying, I can’t live with much colour].

One thing that did stick as my nesting fever continued was an overwhelming need to add greenery to our home. Kind of like literally nesting; in the true sense of the word.

I’ve added little touches of leafy greens here and there through accessories so I don’t scare myself off it too quickly. I ordered this Leaves + dots pillow from K is for Black by Anna Dorfman the other week and I love the pattern on it so much. It’s perfect and has spent time in almost every room since it arrived.

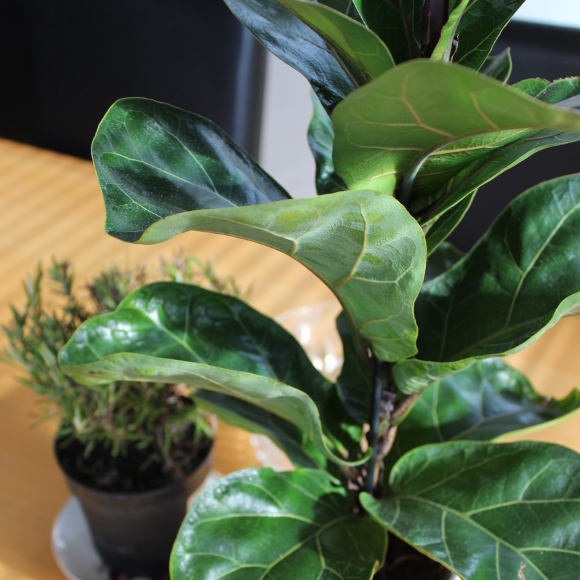
That rosemary plant has since died. On the other hand our fiddle leaf fig [which are known for being picky plants] has grown by 8 leaves since I brought it home in January. It’s gotten so big that I’ll be moving it into the spare bedroom / nursery soon enough! It seems the more difficult the plant, the easier is it for me to keep alive. I’ve given up trying to figure out that anomaly. 

The nursery is DEFINITELY having green happen to it. At the moment I want to paint the whole thing a really dark forest green, but I don’t think I’m brave enough to do it. I’m still getting my head around a design so the spare bedroom hasn’t been touched yet. I’ll be starting work on it in the next couple of weeks now that work it quieting down so I’ll have some energy to tackle it. 
As of tomorrow, bebe will be here in t-minus 14 weeks [I’M IN MY THIRD TRIMESTER WTF!] so I’m hoping to decide on a design within the next week and start soon after. I would have considered myself a fairly nesty person before I got pregnant, but my urge to clean and reorganise every aspect of everything ever is becoming almost uncontrollable. I’m also kind of not complaining. 

How to revive a low pile rug

With two indoor cats and us being two predominantly indoor humans, the viridian rug in our living room gets its fair share of wear. Especially as it’s placed in a high traffic area and since during the winter months we spend most of our time on the couch, our fluffy rug can get pretty sad and flat looking. 

As part of my usual morning routine, I give our rug a quick vacuum with our handheld on a daily basis to keep it tidy. However, recently it’s been getting a bit squashed and worn looking. I had a burst of energy one day so I decided to see if I could bring it back to its former floofy self. I grabbed some basic tools and along with my camera, I took some pictures as I went.  

This isn’t a tutorial or project that’s particularly exciting in any way, but I figured if I benefited from this bout of spring cleaning, there’s bound to be one other person out there with an equally sick satisfaction who takes pleasure in bringing something back to its former self through good old fashioned elbow grease. Here’s how I brought our rug back to life … 

WHAT YOU’LL NEED:
– a rubber brush of sorts [available in most hardware and home care stores]
– a pair of scissors to trim any stray pieces of wool
– a vacuum
– a dust mask [it’s not necessary, but I wore one so I didn’t inhale any rug fluff]

STEP 1: using a rubber brush, I brushed the rug in the opposite direction to which the pile is running. This is easy to figure this out by running the brush in different directions; whichever direction brings it back to its former fluffy self is the right one. Do this with vigour. The best time would be immediately after an argument or if you have something really important that you should be doing but are looking for a justifiable procrastination, then get down on all fours and do this. 

STEP 2: you may not need to do this step, but as we have cats and they occasionally pick at our rug [which I am totally fine with – it stops them from picking at the furniture], you may need to trim some stray pieces of wool. This is easy enough to do and the more often you do it the less you have to trim the next time. It’s not nearly as tedious as it sounds.

STEP 3: brush and trim one section at a time  [I focused on about a two-foot band at a time], then vacuum up all the chaos. When it’s all done, sit back and smugly observe how awesome your rug looks again. It took me roughly an hour to do a really thorough job of the rug in our living room, but it may take you much less. I let our rug get quite bad before tackling it for the sake of a good before and after photo, so keep in mind it doesn’t always look as bad as the before photos.

This isn’t something I expect anyone let alone myself to be doing on a weekly basis. This is something you may do to refresh a rug before you have your mother in law or the Queen come to stay over. I’ve done this once previously to our rug since we got it four months ago, and it honestly brings it right back to life.

It really does look very close to new again. I now just consider its upkeep a form of cardio. Oh, and should you have a flatwoven rug, you can also check out my tutorial on how to repair a very worn [flatwoven] rug here! 

Little living room updates – cast your vote

Back in November while I was editing the photos I took of our new rug, the first picture I included in that post kind of made me uneasy. It was all the colours. And that end of the living room. It didn’t really work anymore. There was too much burgundy, there was too much wood that didn’t match and the rug made it more obvious. It all looked too thrown together and nothing worked. 

Since we’re renting our apartment and are stuck with our landlords furniture [I wish I could burn it to the ground and start over trade it in for more comfortable and practical pieces], I’m forever hitting road blocks in our own home. Of the many pieces of furniture, our landlord’s coffee table has been driving me up the wall. It’s not the same colour as the ‘wood’ floors and it’s quite distressed thanks to previous tenants. And I don’t mean the good kind of distressed that’s trendy. The bad kind. 

When Kimberly updated her vanity and then Linda updated her kitchen counters, both ingeniously using faux marble contact paper to do so, I filed that nicely in my brain [even check out my comment on Kimberly’s post. Ha!]. Contact paper is beyond perfect because when we move out, I’ll simply peel it off and it’ll be immediately reversible. As with most things I’m a bit unsure of, I did a mock up to help me make up my mind. I edited the cat basket to black, slapped some faux marble on the coffee table, and as anyone who has updated their home will know, the design domino effect came into play so the tray on our coffee table got edited too. Many times. 

Here’s what the above GIF is showing, frame by frame …
1. Original living room as it is now
2. Cat basket edited black 
3. Coffee table marble-ised
4. Tray edited black 
5. Tray edited burgundy
6. Tray edited viridian
7. Tray edited pink [for the hell of it]
And to think, this was all done without disturbing Juniper in the slightest.

Here’s where I need your help. Genuinely. Tell me what you think. Marble? Yes or no? A solid colour coffee table instead? And what colour tray should I go with? Or just leave it all alone? Srsly. I’ll be thinking about this one for a while, but a change is defo going to happen. At the moment I’m going for the black basket + marbled table + black tray. But nothing’s set in stone. Or faux marble.