Second hand love dove lamp

I’ve been dying to share my latest second hand find. This morning Cora was compliant enough to let me take some pictures [while she kicked around on our bed], and I was even able to get a bit of a blog post together too. I am feeling very together and boss-mom. For now. I suspect this is a fleeting feeling.

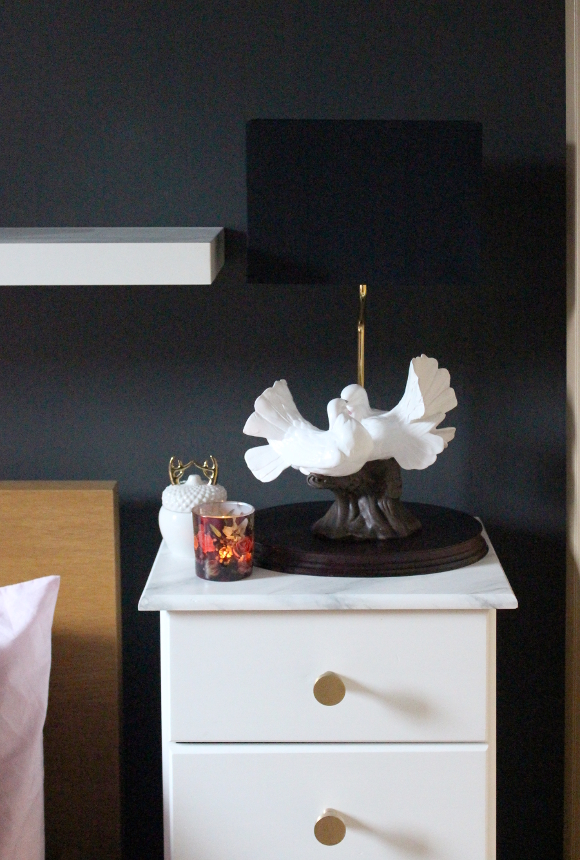
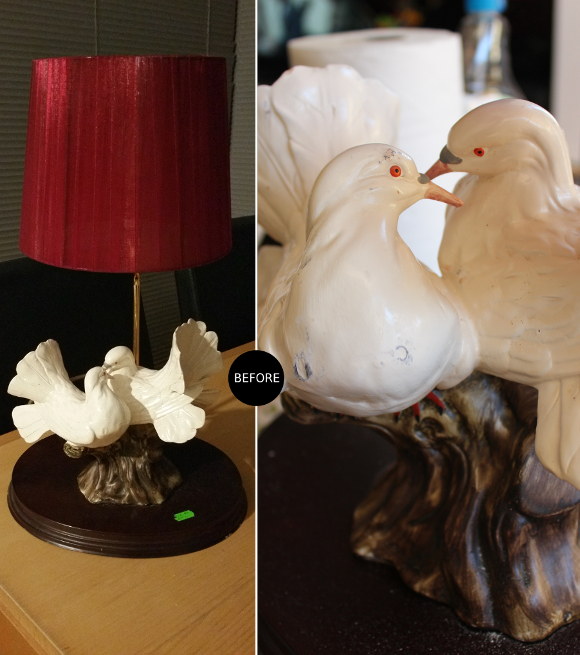
A week or so before Christmas I stopped into Second Abbey to see if the gloriously kitsch dove lamp I spotted months before was still there, and luckily, it was [I’ve had terrible luck lately with things I’ve not bought being long gone the next time I go back to buy them]. The lamp was in good condition [meaning, it wasn’t broken], but it was in need of new paint as it was yellowed and scratched, and a new shade was desperately needed [the current shade was transparent red ribbon wrapped around the wire and looked terrible when the light was on].

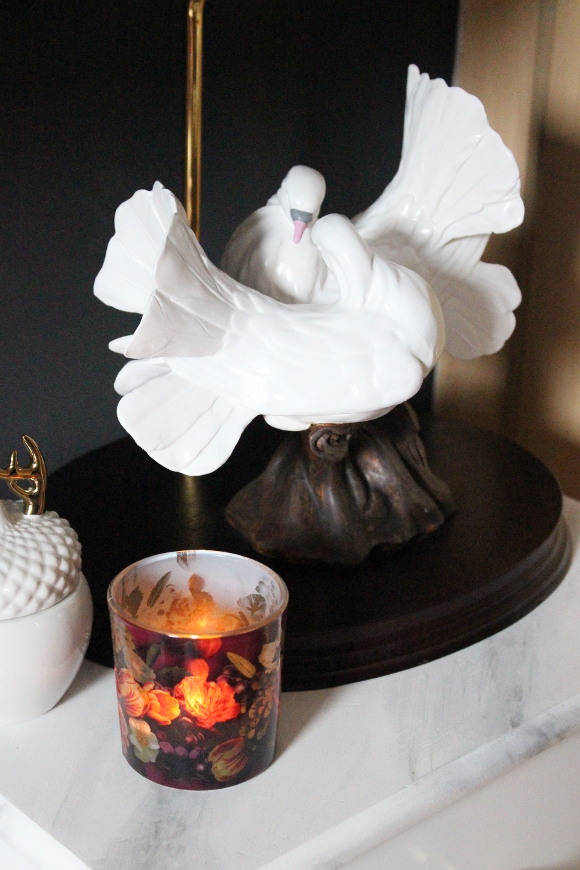
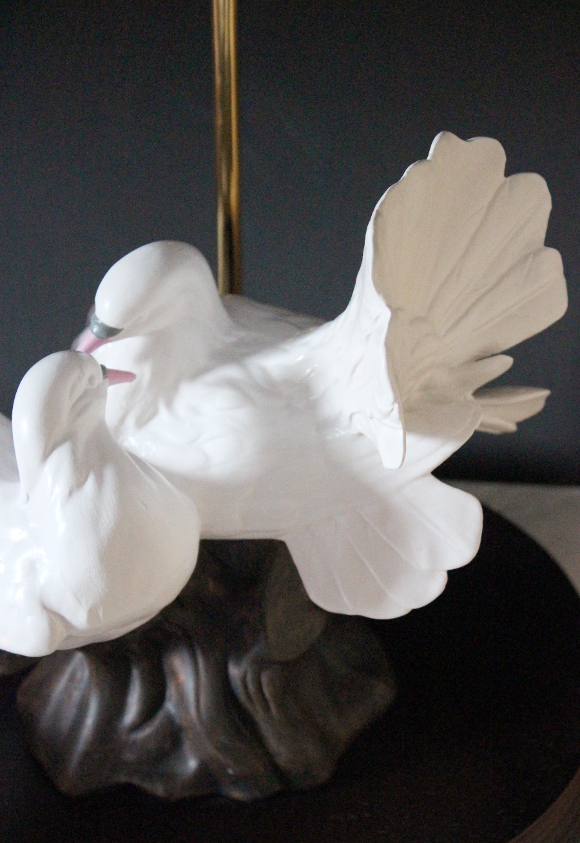
First I cleaned and repainted the doves with white furniture paint. Robert wasn’t too keen on the dove’s anatomically correct beady red eyes that looked directly into his soul, so I painted them white along with the rest of their bodies. Don’t worry, they’re just sleeping! Very in keeping with their new bedroom environment.

I next focused on updating the lamp shade. The shape of the original shade really didn’t suit the lamp. It was far too narrow and made the lamp look very bottom heavy, so on Monday evening I headed to B&Q with crazy lamp in hand and tried a bunch of shades for size. It came down to either a gold glitter lamp shade [which I was very in love with but it unfortunately gave off a very strange glow when the light was on], or a rectangular black shade. As you can guess, the black shade won. The shape is so perfect for the lamp – it’s hard to tell but the size of the shade perfectly balances the oblong lamp base and anchors all the crazy going on below. But the lamp’s update is not completely finished yet. Because our bedroom is painted nearly black, the black shade disappears into the background. I’m thinking of maybe re-covering the shade in a different fabric and adding sassy tassels, but I’m going to take my time and think about what colours and textures might suit it before rushing into anything.

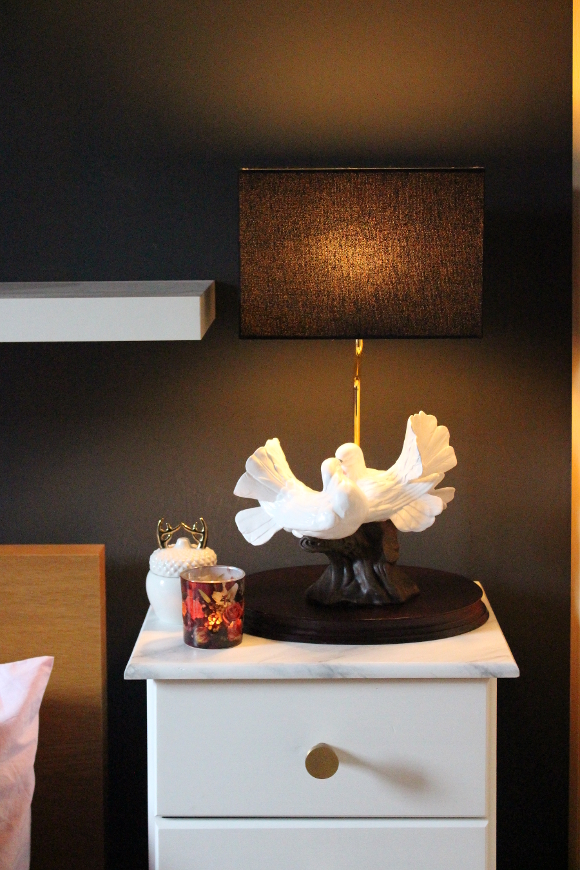
Yeah, it takes up nearly my entire bedside table, but I give zero cares. I just look at how amazing it is and then I get over it.

Colour correcting a Christmas tree

Last Christmas we got a new Christmas tree. We had our previous skinny tree [as seen in this post] for 6 years, which we bought especially for our first apartment which was the size of a matchbox. Such a skinny tree always looked odd in our current living room, so last year I thought it was time to treat ourselves to a full sized tree.
I looked for a couple of weeks but couldn’t find a decent secondhand faux tree online, so we went for a new tree. I picked one out, we brought it home, I opened the box and immediately had an awful feeling. The colour was very wrong. It was way more yellow than a normal tree which made it look dead. A dead looking fake tree.

You can’t tell the true awfullness of the colour of our tree in last year’s pictures because I actually edited the colour on my computer before sharing the pictures. That’s how horrified I was with the colour. The feeling of dread crept up when I soon realised I’d be unboxing our vom-coloured tree again this year, but then I had a very simple idea – just paint it.

The above will give you a better idea of the colour difference – on the left is our previously Exorcist-Green Christmas tree compared to a piece of proper green garland. It may not look too bad here, but when you’re looking at an entire tree that colour, it was very obviously wrong. 
I headed to All City Graffiti on Crow Street last week on the hunt for a merrier green to spray paint our tree and found the perfect shade of ‘Amazonas Green’ …

That afternoon I took our entire Christmas tree outside and set it up / opened up all the branches. There was a light breeze, which I used to my advantage, and I used it to lightly mist the whole tree vs. spraying it with an intense stream of paint. Holding the can about 1 foot away from the tree I sprayed one section at a time, turned it, sprayed another section, turned again, and repeated until I was happy with the coverage. It was incredibly easy to paint in this way and I was finished in about 20 minutes [including drying time as the light breeze was again very helpful].

I’m really so much happier with the colour of our tree. The last thing I wanted to do was have to buy another Christmas tree as that would have been a complete waste and I’m very conscious of buying things unnecessarily, so I’m so glad it turned out looking as good as it does. It’s a proper Christmassy green now and it no longer makes me cringe when I look at it. Yay! o/

I put 2 sets of lights onto it this year [one plain, the other chasing lights] and I’m quite happy with just leaving it like that. I like the idea of just lights this year. Leaving it as a naked tree. What do you think? I’m going to add some sort of makeshift tree skirt and maybe some ribbon to the very top, but overall, no decorations. I just really like the idea of keeping things a bit simpler this year. 

Coffee station update – mini faux marble plinth

Last weekend I made a very simple change to our kitchen. This time last year I updated our kitchen and created a mini coffee station in the far corner. Said coffee station looked a bit lonely. Like it was being punished and put in the naughty corner. Making hot drinks is a social thing so I first brought it all forward to the middle of the kitchen. 

For a while now I’ve wanted to get rid of the black tray we were using previously and get [or make] something a bit more fresh all up in there. I had a large chunk of timber in our storage cupboard for a couple of years now, so I cut it to a more manageable size and luckily had the perfect amount of leftover marble contact paper to cover the piece. I quickly covered it and used it to prop up all our coffee and tea accessories. It’s the perfect size for our kitchen, helps define our little station without taking up too much space or height and is in a perfect wipe-able finish. 
I really do love when you make a small change to your home and it makes all the difference. Robert [who is the sole user of both coffee and tea in our household] was really happy with how it turned out and how fancy it looks. These kind of projects are my favourite. Especially when they cost next-to-nothing or even better – completely free.