#PicadoMexican – pay and display

Earlier this week #PicadoMexican had its official opening and all I’ll say is Lily and Alan sure know how to throw one hell of a party. It took husband and I a couple of days to recover, and while we’re still buzzing from the party, I thought there was no better time to share my final Picado feature! Today’s final installment is all about one of my favourite parts of Picado – the pay and display area.  

Before I start, below is a little reminder of the space beforehand as well as my design proposal for the space that I presented to Lily and Alan … 

NOTE: 1-8 are part of the kitchen and retail areas. 
9. The main floor space was reserved for when Lily will be teaching her classes. A table will be set up and the chairs will be taken off the wall for people to sit at, takes notes, and get their NOM on. During the day it’s used as additional display space. 
10. We were going to paint a red line [in keeping with the external signage] along the wall and floor to create a barrier-withouth-a-barrier if you know what I mean, between the public and private space, but fortunately no customers have wandered into kitchen. Success! No line needed.
11. It made the most sense for me to place the till area here. Both as a visual barrier for customers as they walk into the shop and hopefully [successfully!] divert their path and dissuade customers from walking straight into the kitchen. I also wanted to use a sturdy till area and not just a table, for security  / till reasons.  
12. Oh, the chair wall. It’s gotten the most attention out of the whole shop. In the very beginning I had secret ideas about hanging chairs up on the wall for Lily’s cooking classes to save on the limited floor space. Then Lily emailed me about the FRODE folding chairs in IKEA, which were the perfect Picado colours. I nearly kissed Lily right on the mouth. They were perfect, and with some help from BJARNUM folding wall hooks and Alan’s handyman dad, the chairs were up. 

At the official opening of #PicadoMexican on Monday night, I talked to a few people I didn’t know [just a few, I’m quite bad at socialising], and each person commented on the chair wall; ” … that’s such a great idea and you know, so unusual!“, without realizing I was the designer. I really enjoyed their unfiltered and honest feedback on the shop. It really made me so proud of the shop and the work that went into it, and more importantly, so excited for Lily and Alan and what lies ahead. 

It was a really amazing party on Monday night [did I mention the incredibly dangerous / delicious bespoke Mexican cocktails by Oisin?] and in the most celebratory way possible, the opening party was a form of closure for me on the project. My Mexican love-child with Lily and Alan is real. It’s full of love, people adore it, and if you haven’t visited it, I will find you and I will make you. For the Mexican food alone, go. Forget the design. 
And at running the risk of sounding like a broken record, thank you Lily and Alan. For the opportunity. For letting me get carried away with you. For believing in me. For all the pizza. For shooting the breeze. And for listening to my crappy jokes.Thank you.

New project – Canadian man cave, office edition

I’m really excited today to share my latest project as it’s very close to home; I’ll be lending some of my design expertise to my broseph to help szhuzh-up a gentleman’s Canadian man cave makeover to his new office! And I’m getting all sorts of emo all up in here looking at Canadian mood boards. 
My broseph is currently in college so the budget is pretty tight. I’ll be working on recycling and upgrading the pieces of furniture and accessories my brother already has and reincorporating them in a new way. I like a good budget challenge! 
To give you an idea of the room, below are a couple of pictures showing what my brother’s office looks like at the moment [keep in mind he just moved in, so there are a variety of items / boxes in here at the moment] … 
First up – we’re going to kill that magnolia with fire. We’ll be changing the layout of the room and since we’re a little strapped for space, we’ll be making the most of the walls. I’ll also be adding lots of tiny and budget-friendly changes such as updating and coordinating the handles on the closet with the soon-to-be revamped drawers [as seen in the corner of the second ‘before’ picture]. 
To give you some visuals and a better feel of the mood I wanted to create for this room, below you’ll find the inspiration from Pat that started it all … 
When I first saw Pat’s Canadian cabin nursery design, I knew something along these lines would be perfect for my brother. He is after all, the only legit Canadian in our family. I loved how Pat’s nursery wasn’t over the top cheesy-patriotic, but it so perfectly incorporated a Canadian slant into the design.
And some clean, gentlemanly office inspiration that I stumbled upon on Pinterest. So far, here are just some of the ideas I’ve magicked up with my brain machine … 

1. I was thinking a subtle way of adding some personality to the office without going too OTT with colour is to add some colour to the curtain rod. This can easily be done with spray paint, doesn’t cost a lot, and can also be repainted at a later date [side note: there won’t be black curtains].

2. The cardboard stag’s head I bought in Marks & Spencers last year has been gathering dust in our apartment, but it will look perfect in my broseph’s new office. Ca-ching. 
3. I don’t know how possible this will be, but I’d like to include either a birch branch or birch bark into the design. Now, all I have to do is find some birch available in Ireland … 
4. Clipboard wall! One idea I had as a functioning focal point was to have a clipboard wall above his desk, as an alternative to a bulletin board or chalkboard wall. A chalkboard wall would be too dark and overwhelming in such a small room. Whereas a row or two of clipboards would be able to hold not only assignments, but tickets for events, reminders, and similar to what’s in our kitchen, I could paint one of the clipboards with chalk paint so it can be taken off the wall and written on. 
5. I’m going to try my hand at DIYing some pillow case covers by upcycling some old plaid shirts [see below inspiration on this idea from Pat].  
6. I couldn’t resist including the man blanket I crochet for my brother a couple of years ago. It and other textiles will add another level of comfort to the room for snuggling up on crappy rainy days and watching movies.
7. I’m still on the bench when it comes to wall colour. I’d like to with a warm shade of grey that’s barely there grey. Really close to white, but enough grey that broseph’s white desk will stand out. I think grey, when used in the right conditions, can make everything else POP in a room and add warmth. That is, with the right shade. We’ll see how the paint tests go. 
I’m excited to get started and help my little [yet an entire foot taller] broseph with the gentleman’s office he deserves. I’ll be sharing updates on the room as it develops so stay tuned! 

xx A

p.s. “Office edition?” I hear you say. Yes, office edition, meaning there’s gonna be MOAR ROOMS! I’ll be updating broseph’s bedroom too after his office is sorted. 

#PicadoMexican – retail details

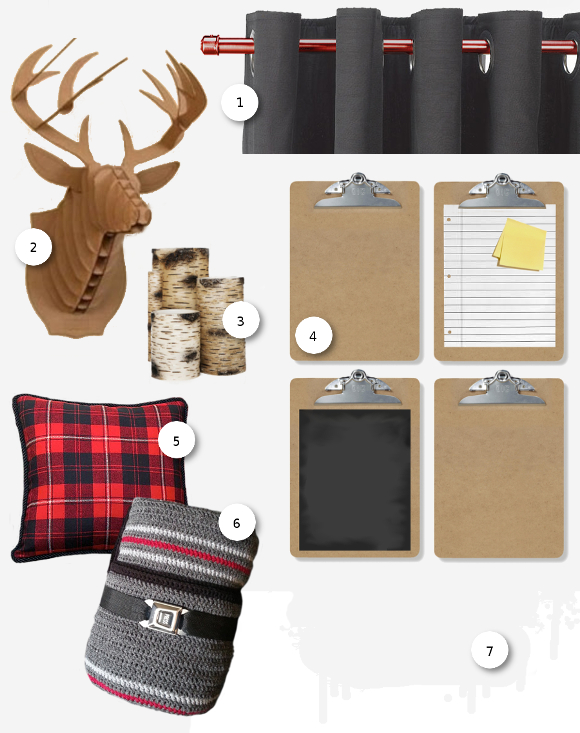
A couple of weeks ago I shared a plethora of photos of the newly completed #PicadoMexican pantry. As there was so much involved in the project, I wanted to break down the details into 3 parts detailing the different sections of the shop – the retail section [that’s where you are now!], the kitchen, and the pay and display. I wanted to share the good, bad, and the mostly awesome roller coaster ride and design process that made #PicadoMexican what it is today. So let’s get stuck into the details, shall we? 

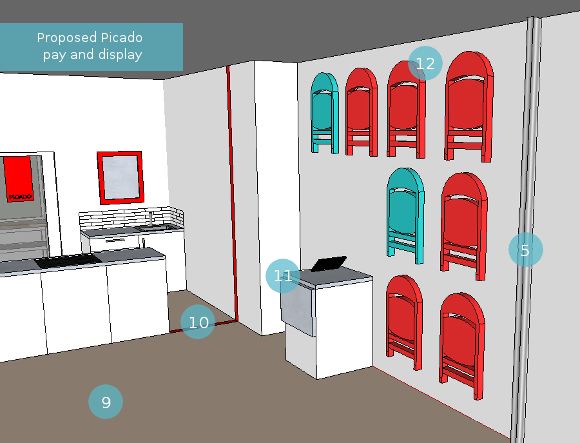
To give you a recap, this was my original design proposal …

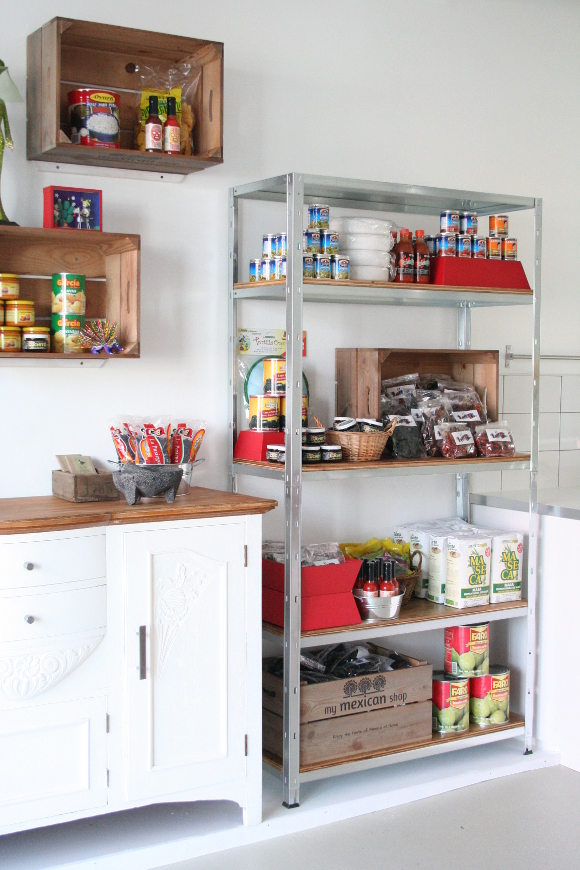
NOTE: 1-4 are kitchen details and will be shared within the next 2 weeks.

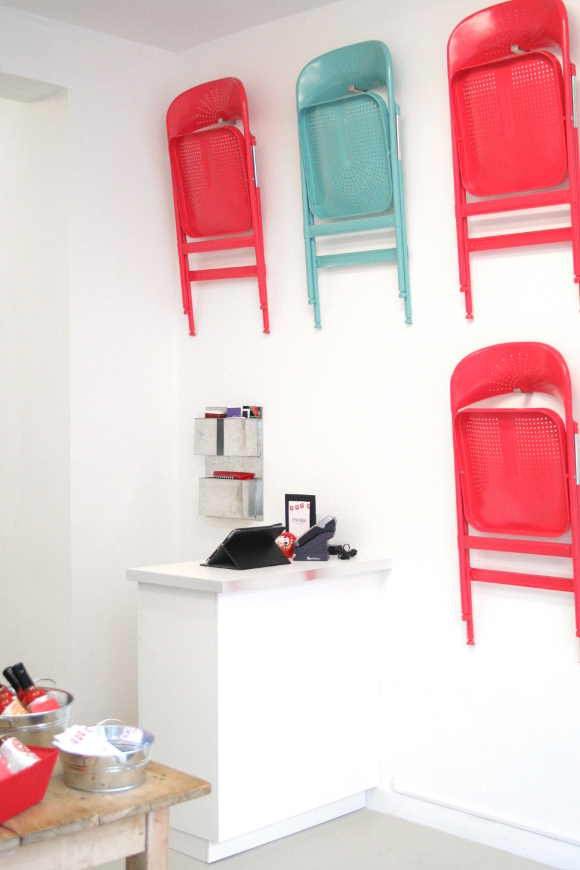
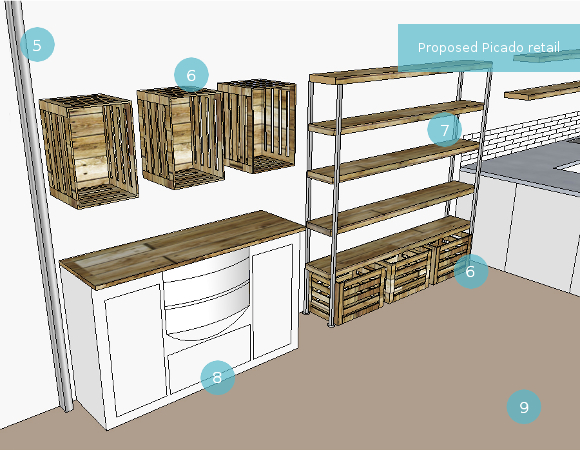
5. Since the security shutters could only be installed within the shop, they in a way acted as a separation between the shop and the window display. We’re making this space work to our advantage! 
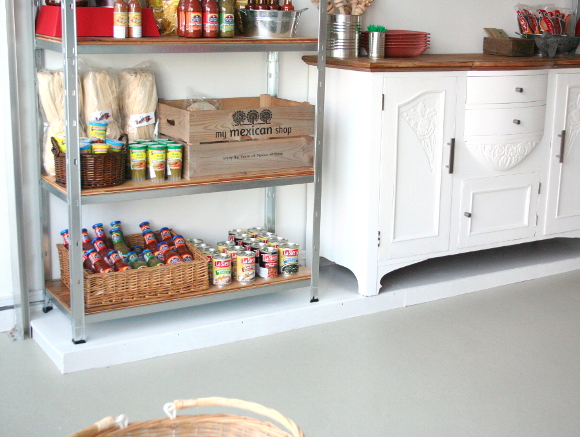
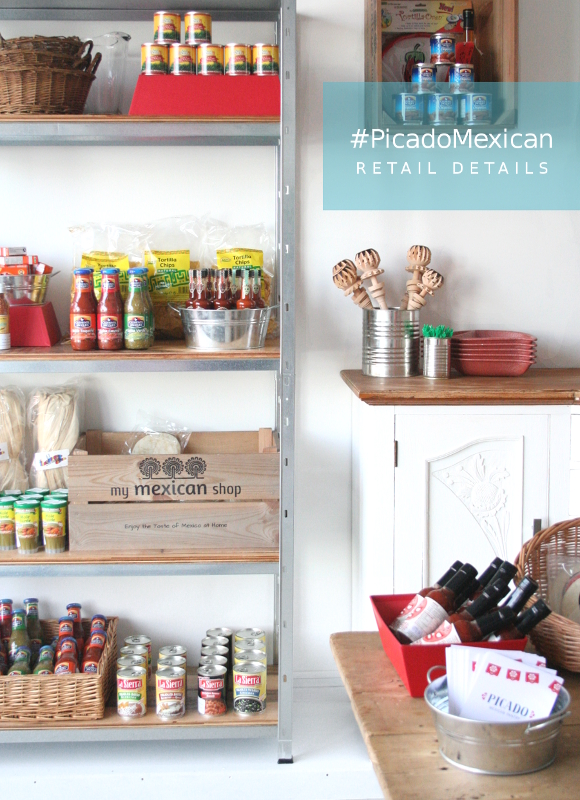
6. Lily and Alan had 10 industrial crates made for their My Mexican Shop market stall. We reused these as mini display cabinets to add another level of shelving as well as storage units. 
7. Some industrial style shelving was added to the space for displaying the main food products and ingredients. My original plans for this area fell through, but it just meant I had to come up with something better. More details on these will be detailed below … 
8. It was important for me to incorporate pieces Alan and Lily used throughout their market days, so I upcycled a vintage dresser of theirs and incorporated it into the shop as a display piece and as extra storage. 
9. The main floor space will be doing double duty – a table will serve as a display area and in the evenings during Lily’s cookery courses, will serve as a prep and an om nom nom area. 
And here’s how we incorporated the above into the retail section. Well, as best as we could. There were some hiccups design challenges, but we were well up for it … 

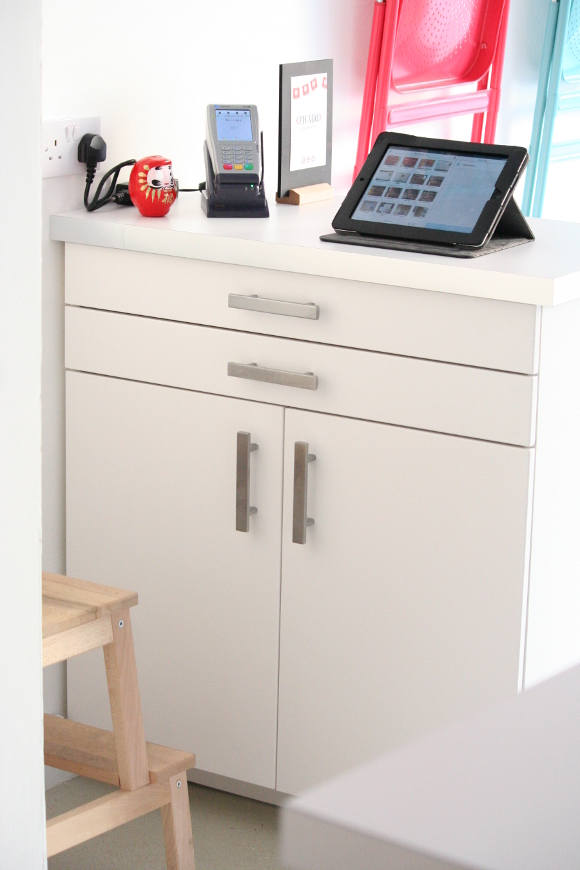
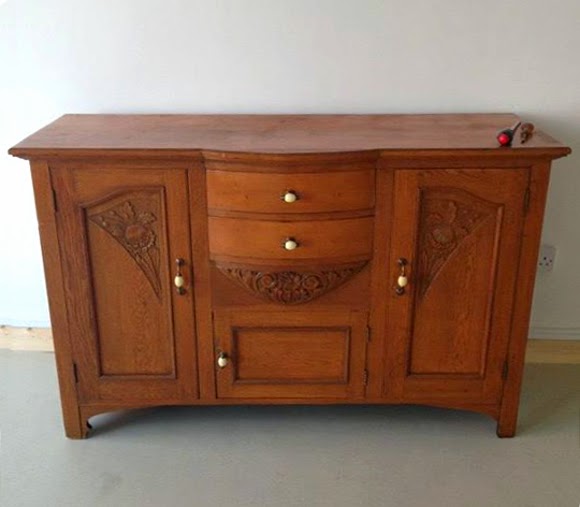
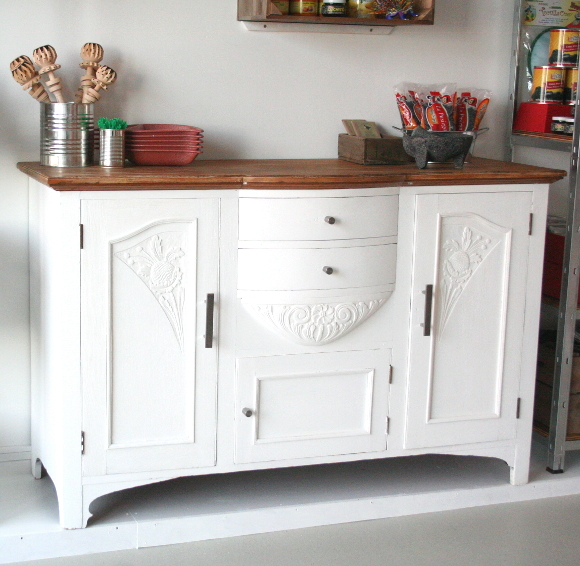
Lily and Alan’s vintage dresser was something I wanted to incorporate into the design. I felt it was important to carry through some roots from their pantry and market stall beginnings. The vintage dresser wasn’t a family heirloom of theirs so they were more than happy for me to repaint it. This beast of a dresser is quite a solid piece and was used as a display cabinet back in the day, so it didn’t stray far in Picado. I couldn’t not incorporate it into the design. 
I sanded it down and wiped the dresser before applying 3 coats of Annie Sloan’s pure white chalk paint. I removed the existing hardware and replaced them with stainless steel EKEBODA handles from IKEA, which not only fit in with the industrial slant we were taking, but they’re the same handles that were used on the kitchen cabinets which [I like to think] subtly link the two spaces together.

As for the main storage, I was originally hoping to construct a set of pipe shelves. But as it turns out, pipe accessories are hella expensive here in Ireland compared to all those North American tutorials I drool over endlessly. With each piece costing upwards of €8.50, that option was quickly ruled out. I was in B&Q at the time so I voiced my concerns to one of their hardware specialists. I told him a bit about the industrial look we were going for, “…kinda like these industrial shelves used to display stuff here in B&Q …”, as I stared up at the ginormous shelving all wide-eyed. He pointed me in the direction of their 5 tier galvanised boltless shelves, and I ran.

The galvanised shelves met everything we were looking for. They were the perfect size for two shelves to flank either side of the vintage dresser and they were well within budget. There was however one minor detail I was a bit concerned with – the thickness of the shelves. The label said the shelves could take 65kg per shelf, but the metal shelves themselves were a bit warpy and would pop up and down in the centre. You know, and make that loud flexing metal sound? The majority of #PicadoMexican‘s products were in glass bottles or tin cans, and I was concerned that such dense items would warp the shelves. So to give them some extra stability I suggested adding chip board to strengthen and evenly distribute the weight. Alan’s dad expertly cut and stained the planks of chip board to fit each shelf which also added to the industrial look, and tied in with the wooden top of the vintage dresser. Weight now evenly distributed = winning. And it looks good? Winninger. 

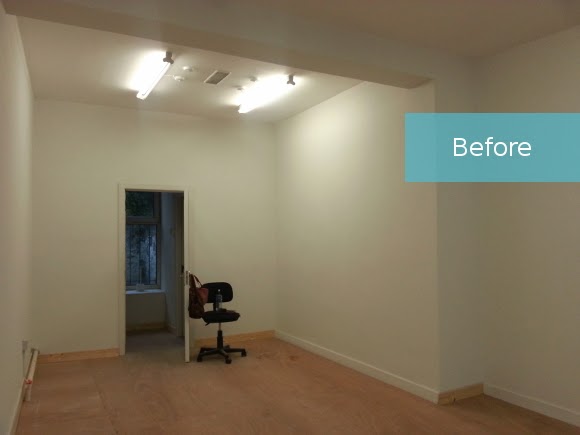
Then there was the floor – this is something I don’t think I can describe to you without using a lot of hand gestures, but I will try my best. You see, the floor in #PicadoMexican was a curious floor indeed. 1/3 of the floor was completely level, aka. the kitchen, but the area between the kitchen and the front door, the floor sloped in an unruly way. Not only did the floor slope away from the walls, it also sloped towards the front door. It sloped in not just one, but two directions. Meaning, if you emptied a bag of marbles across the back of the shop, they’d all end up at the front door. Okay, that may sound a tad dramatic, but it was enough of a slope to notice. Hopefully my terrible diagram will make a little more sense … 


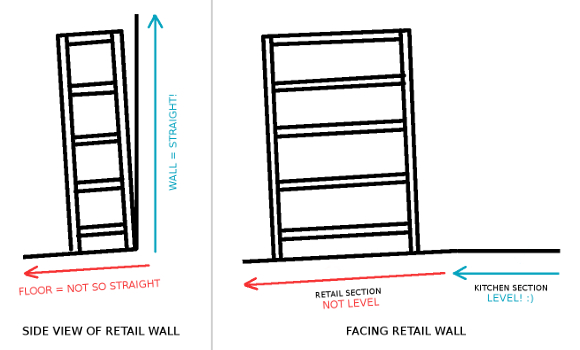
It meant that when we first assembled the shelves and put the base of them against the wall, the top half of the shelves were tilted away from the wall, as well as sloping down to the left. I burst into a cold sweat. I went home that night a failure. How was I going to fix this? I came up with all sorts of wild ideas, most of which involved anchoring the top of the shelves to the wall, and some of which involved me attacking things with a saw. We couldn’t have shelves teetering all over the shop in case [god forbid] someone knock into them, the shelves and their contents would collapse on top of them. I would literally have blood on my hands. To say I lost sleep over it was an understatement. 

Then one morning I woke up at 3am with a solution – build a tiny step / ramp / deck that will level off one side of the shop that the vintage dresser and shelves can sit on. It seems wildly obvious to me now, but at the time it was a real case of not being able to see the forest through the trees. I passed the details onto Lily and Alan’s carpenter, Allen, and his mad carpentry skills produced this bad boy. It is perfection and I nearly cried at his skills and if it’s not too conceded to say, my being able to solve the problem. I conquered the sloping floor before it conquered me. And it very nearly did. 


So those are our little stories behind the design process the retail section went through to get to where it is today. Check back next week when I’ll be sharing details and pictures for the kitchen section of #PicadoMexican

xx A