Little living room updates – cast your vote

Back in November while I was editing the photos I took of our new rug, the first picture I included in that post kind of made me uneasy. It was all the colours. And that end of the living room. It didn’t really work anymore. There was too much burgundy, there was too much wood that didn’t match and the rug made it more obvious. It all looked too thrown together and nothing worked. 

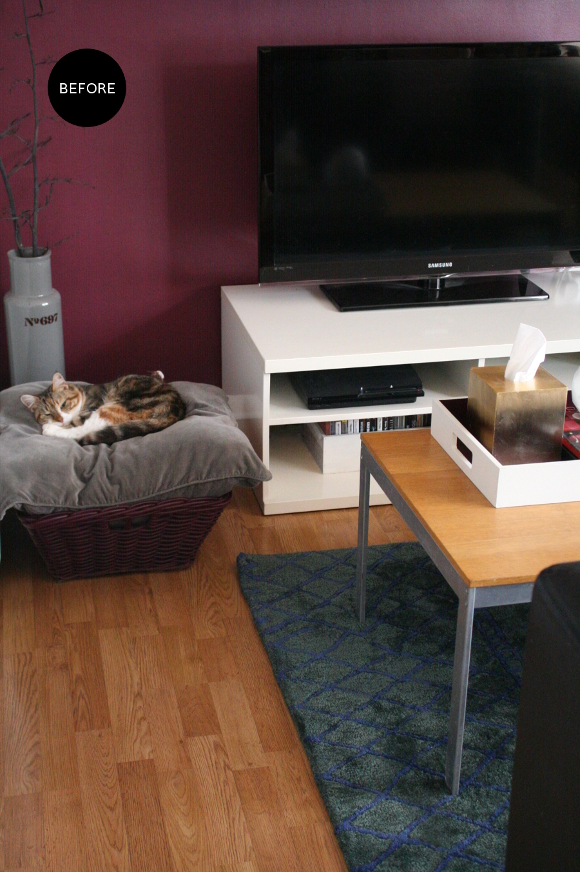
Since we’re renting our apartment and are stuck with our landlords furniture [I wish I could burn it to the ground and start over trade it in for more comfortable and practical pieces], I’m forever hitting road blocks in our own home. Of the many pieces of furniture, our landlord’s coffee table has been driving me up the wall. It’s not the same colour as the ‘wood’ floors and it’s quite distressed thanks to previous tenants. And I don’t mean the good kind of distressed that’s trendy. The bad kind. 

When Kimberly updated her vanity and then Linda updated her kitchen counters, both ingeniously using faux marble contact paper to do so, I filed that nicely in my brain [even check out my comment on Kimberly’s post. Ha!]. Contact paper is beyond perfect because when we move out, I’ll simply peel it off and it’ll be immediately reversible. As with most things I’m a bit unsure of, I did a mock up to help me make up my mind. I edited the cat basket to black, slapped some faux marble on the coffee table, and as anyone who has updated their home will know, the design domino effect came into play so the tray on our coffee table got edited too. Many times. 

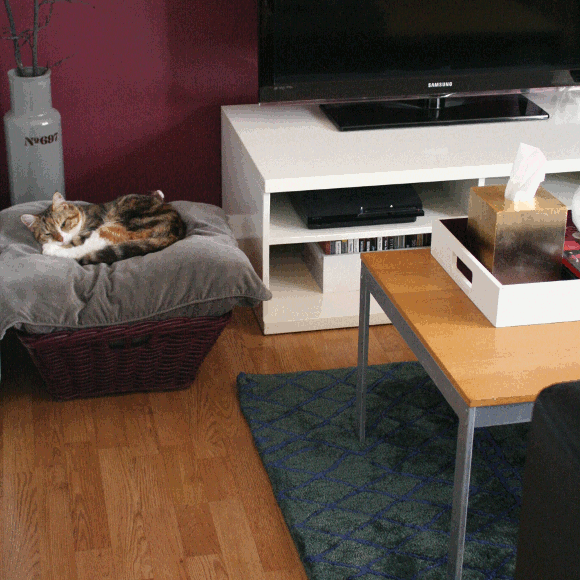
Here’s what the above GIF is showing, frame by frame …
1. Original living room as it is now
2. Cat basket edited black 
3. Coffee table marble-ised
4. Tray edited black 
5. Tray edited burgundy
6. Tray edited viridian
7. Tray edited pink [for the hell of it]
And to think, this was all done without disturbing Juniper in the slightest.

Here’s where I need your help. Genuinely. Tell me what you think. Marble? Yes or no? A solid colour coffee table instead? And what colour tray should I go with? Or just leave it all alone? Srsly. I’ll be thinking about this one for a while, but a change is defo going to happen. At the moment I’m going for the black basket + marbled table + black tray. But nothing’s set in stone. Or faux marble. 

DIY Friday – travel pet pillows

Around this time last year when we were away on holidays, I shared a little picture of the pet travel pillows I made especially for us to bring with us since we’re crazy cat people to our core and really miss little Juniper and Toshi while we’re away. I figured being able to smoosh our faces into poor replicas of them would stave off a small amount of home sickness whenever we’re away. And since we’ve brought them with us 3 times since, it actually works!

And here’s how I did it …

Last year when I made these travel pet pillows, I had taken photos of each step, but when I went through my external hard drive I couldn’t find a single picture. So apologies for the lack of tutorial photos. It’s a fairly straight forward project anyways, and I’ll try to explain as best as I can how I did it. 

I first photographed Juniper and Toshi on their own, in good light, making sure they were facing me and being their cute selves. I opened each photo in Photoshop [or the Linux equivalent ‘Gimp’] and traced around them using the paint tool set to white. I carefully did this and coloured out the rest of the photo until the entire photo was white, with the exception for each fur baby. 

I saved each image as a jpgon a USB key and went to one of those gift kiosks in a local shopping centre that specialises in printing images onto objects. They printed Juniper and Toshi onto a square pillow each. As these were going to be travel pillows and the smaller they are the better, I sewed the pillow closer to the silhouettes of each cat and filled them with extra stuffing I had. That’s it really! 
We bring our travel pet pillows every time we’re away from home. Even during our Christmas holidays when we’re staying down the road with family for a few days, our pillowed kittens come with us too. As crazy as it sounds, it’s a little ritual we now have to take Juniper and Toshi out when we first get to our hotel and squeeze them a bit. 
Husband even has a few sneaky photos of me passed out, face mask on with a kitten pillow under each arm for every holiday we’ve been on since I made them. And no, you won’t find those pictures hitting the internet any time soon. Sorry 😉

Master bedroom makeover update – Part I

Since blogging the plans for our bedroom last November, I’ve done nothing. Not a thing with our room. Then out of nowhere since Friday, I’ve crossed about 10 things off my to-do list. Am I the only one who works like that? Nothing for ages and then I get loads of it done in one go. What is that? Binge DIYing? 

There have been a couple of changes to the design for our room since November, but I’ll share those once it’s finished. One of the more unusual factors I had to take into account for our room is the light. I don’t mean the light fixture, but the natural light we get in our bedroom is a very cold hue and not particularly inviting. I’ve learned this over the years when it came to introducing colours into our room. Anything in the purple-blue-green range made the room even colder. But, luckily for me, whenever I introduced my favourite burgundy hue, all is magically warm and cosy again. 

Berry hues, warm woods and little hints of gold. Here’s a splash of what I have planned –

1Textured cushions from Dunnes Stores. These are standard cushions from Dunnes that they’ve had in stock for years, but I adore them. I have one already so I just need to pick up another. Or four.
2. I have a sneaky project involving one of my favourite pictures I took in St. Petersburg last summer. Stay tuned.
3. I ordered this Escape from New York print by Mike Wrobel and it’ll be perfect in our room. Snake Plissken FTW.
4. Good old Mozart jewelry bust will be in the spotlight.
5. The dark red plush throw from Marks & Spencer husband got me for Christmas is the perfect colour. 
6. I haven’t crocheted in years and my yarn is guilting me. I spotted a couple yarn projects by A Beautiful Mess (this and this) and I have every intention of making a few to make our room feel cosier.
7. This snow leopard throw by Wayfair. We’ve had it for a couple of months so far and it’s SO LUSH.
8. Our Scrabble monogram will be reintroduced to our room and maybe even hung up.

There are projects I’d also like to DIY on the cheap for our room. Such as finding and updating a pair of secondhand bedside tables, making our own cardboard monogram and a good few yarn hangings as detailed above.

So far, in my recent burst of readying our room, I disassembled the shelves in the corner of our room [which you can see here], swapped our bed frame with the frame in our spare bedroom [by myself. Word to the wise – don’t try that by yourself], and I also repainted the yellowed-old-as-hell skirting boards and bedroom door. It was seriously bad … 

Like, embarrassingly so. There’s still a stubborn rusty nail peeking through, but it’s miles better already. I was thinking of Photoshopping it out but thought, no. This is real life and life is a little rusty nail, refusing to absorb the white paint. 

Our landlord is visiting this afternoon, which is one of the pushes I needed to get the bones of the work done in our room. I’ve scrubbed every inch of our apartment this week, including vitally important places like behind our TV, under our bed and our fridge. Because you know, our landlord is going to be inspecting those places. I’m a worrier and when I worry, I overcompensate. 
Wish me luck xx